 Normally a mailbox only has one e-mail address. However, nowadays, several e-mail providers allow you to set multiple addresses on just one mailbox.
In the corporate world, it is also not uncommon to have addresses from ex-employees or special projects assigned to your (Exchange) mailbox.
This guide describes the definitions and affects of aliases on Outlook.
- So what are aliases?
- Why would I need an alias?
- How can I change the default alias I send with?
- How can I choose which alias to send out with?
- How can I choose which alias to send out with when using an Exchange account?
So what are aliases?
 Aliases are nothing more than different ways to mail to a certain mailbox. Just like a single person can be reached on more than one phone number, a single mailbox can be reached via different email addresses.
In most cases your ISP will give you one mailbox with one address they choose for you (often this is an abbreviation of the name you are registered with for their services or your username). They probably will also give you the opportunity to add 3 or 5 address you choose to the mailbox. This can be any name as long it has not been reserved already.
Within a company, you usually cannot pick your own address(es) for your mailbox but it (they) will be generated according to your company’s standards.
Why would I need an alias?
 An alias can be quite handy for sorting your incoming mail or just so that your e-mail address looks better to the person you are giving your address to. Think about the following situations;
- You got one mailbox from your ISP with a default address of your username e.g. jsmith123@ISP.com
- For your friends and family to contact you, you can have your full name e.g. john_smith@ISP.com
- For professional or more formal use of your address (like when applying for a job) you would like to have an address that just looks better e.g. j.smith@ISP.com
- For newsletter signups, you can append “-newsletters” to your address e.g. john_smith-newsletters@ISP.com
The messages sent to the aliases still end up in your mailbox just like they were sent to the original address. However, in Outlook, you can now set rules on how the emails behave (like sorting them into different folders) when sent to a specific alias. You could compare this with how you can decide not to pick up your business phone after 17.00 but still answer your cell phone ;-).
How can I change the default alias I send out with?
 How to change the default address you are sending out with to another alias linked to your mailbox depends on the account type you are using.
POP3 and IMAP
When you use a POP3 or IMAP account, open the Mail applet in Control Panel, click on Email Accounts…, open your account properties and change the e-mail address to the alias you like.
Yes, it is that simple! Leave your login information as is, even when this is formatted like your main email address.
E-mail address configuration for POP3 and IMAP accounts.Outlook.com
When you use an Outlook.com account, the default alias can’t be controlled from within Outlook but is controlled via your Microsoft Account. Go to the “Your info” section and click on the “Manage how you sign in to Microsoft” link. Click on the “Make primary” link behind an alias to set it as the default outgoing address.
In Outlook itself, you may still see your previous alias for your account name. This is purely cosmetic. If you want to update this as well, then you’ll have to remove and re-add your Outlook.com account to Outlook.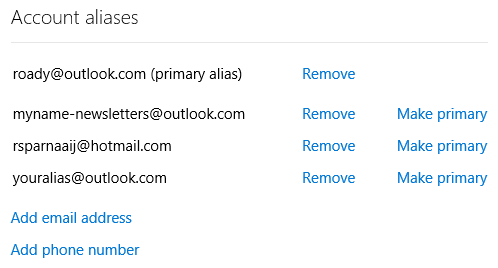
Aliases configured for an Outlook.com account.Exchange
When you use an Exchange account, you can’t change the default alias yourself. You’ll need to contact the Exchange administrator or support desk of your company or school who owns the domain to make the change.
How can I choose which alias to send out with?
 There are various methods to enable you to choose which alias you are using when sending out an email.
Which method to use works depends on your needs, Outlook version and mail account type.
Method 1: Configure an additional Send-Only POP3 account (all account types)
 An easy method to enable you to choose between aliases when sending an email is by setting up a (second) POP3 account alongside your original POP3, IMAP, Outlook.com or Exchange account but with one of your aliases as the address.
If your current mail account type is an IMAP or Exchange account, contact your ISP or mail administrator if your mailbox is also accessible via POP3. For an overview of POP3 settings for popular free accounts see; Configure Outlook with Outlook.com (Hotmail), Gmail, Microsoft 365, Yahoo, or iCloud.
Important:
Make sure you set the Send/Receive settings for the alias account to not to receive mail to prevent duplicates. For more information about how to configure this see the guide Duplicate E-mails – Multiple Accounts.
Now when you want to send a message with an alias, you can click on the From button to select your outgoing account.
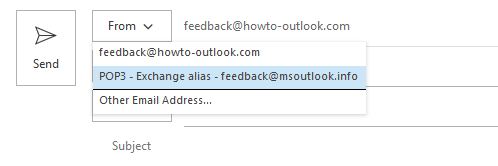
Additionally, you could Rename your accounts to easily distinguish between them.
Method 2: From field and “sent on behalf of” (POP3 and IMAP)
 Another way to go would be to set the From field, when composing a new message, with the alias you want to send with. To enable the From field for your version of Outlook see; Enabling Bcc and From fields.
You can now click on the From button and choose “Other E-mail Address…” to specify the alias address.
The downside of this method is that you will send the message “on behalf of” so it will look like this; (default alias) on behalf of (alias). This is because this option is normally used in Exchange environments where people can allow others to send out a message out of his/her name; very handy for secretaries who handle the mails for his/her boss.

By manually setting an address in the From field, you’ll be sending “On behalf of”. Replies will be sent to the alias address.
Method 3: From field (Outlook.com)
 When you use an Outlook.com account in Outlook 2013, 2016, 2019 or Microsoft 365, then you’ll automatically see your configured aliases when clicking on the From field. Select any of these aliases to send as that alias. In contrast to POP3 and IMAP, these emails will not go out as “on behalf of”.
When using Outlook 2010, these aliases aren’t automatically being added to the list to choose from but you can add them manually by choosing “Other Email Address…”. Outlook will remember these addresses so you’d only have to do it once per alias.
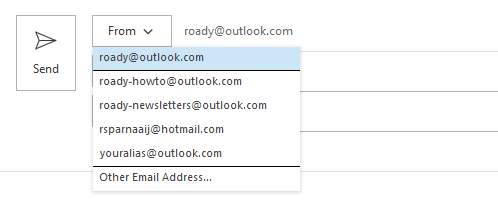
You can send from an alias address by selecting it from the From button.
How can I choose which alias to send out with when using an Exchange account?
 If you have an Exchange account with multiple addresses assigned to it, the above methods will not work for the following reasons;
- The Send-Only POP3 account method often doesn’t work because configuring your Exchange account as an additional POP3 account usually isn’t allowed.
- The “sent of behalf of” method won’t work since when you type the address of the alias, by default Exchange automatically resolves the address to your mailbox and continues to send out with what is configured your default mailbox address on the Exchange server.
- Outlook unfortunately doesn’t expose your alias addresses of Exchange accounts in the way to it is done for Outlook.com account (but it might soon and you can still achieve this via Method 1 shown below).
To overcome this, there are 4 methods available. Methods 1, 2 and 4 require assistance from your Exchange administrator. Method 3 and 4 require an add-in to be installed on your computer.
Method 1: SendFromAliasEnabled in Exchange Online Microsoft 365
 This method is actually the solution when using Exchange Online. Exchange Online has native support form sending from an alias when your Exchange Online administrator sets the SendFromAliasEnabled parameter via PowerShell for Exchange Online.
Set-OrganizationConfig –SendFromAliasEnabled $true
Users can now specify any of their aliases in the From field and the address will be maintained for all (external) recipients instead of resolved to their primary alias.
Obviously, replies to this alias address will still arrive in the expected mailbox and even then the alias is still shown. This will allow you to create Message Rules based on your alias addresses as well (like categorizing it or moving it to another folder).
The aliases used will remain in the user’s From dropdown list for future easy re-use.
Method 2: Configure an Active Directory Distribution Group with your alias
 This method is only really workable when there are only a small amount of people in your organization who need to send out via specific aliases. The reason for this is that it requires quite a bit of additional configuration on the administrator side and it also breaks some principles of centralized administration (Both method 3 and method 4 offer a more integrated solution).
Instructions for the Exchange administrator;
- Create a mail enabled (Active Directory) Distribution Group with the name of the user you want to create an email alias for. You can do this via the, Exchange Admin Center (ECP) or PowerShell (so not in Outlook!).
- Set the primary reply email address of that Distribution Group to the alias for the user.
- Add the user this alias is for as a member to the Distribution Group.
- Set “Send As” permissions on the Distribution Group for the user who this alias is for via Exchange Admin Center (ECP), PowerShell, or Active Directory Users and Computers;
- Exchange Admin Center (ECP)
On-Premises
Section Recipients-> tab Groups-> double click on the Distribution Group-> section: Group delegation.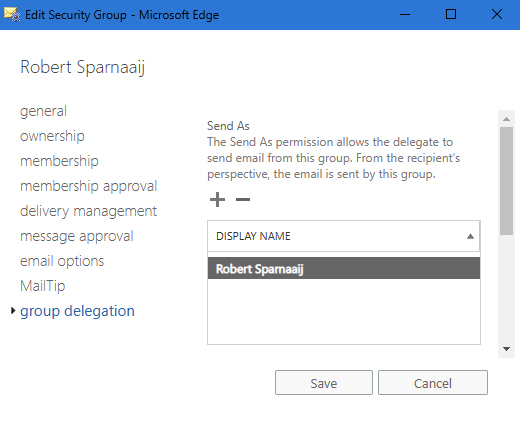
Setting Send As permissions on an object in the Exchange Admin Center (ECP).Microsoft 365 Exchange Admin Center
Section Recipients-> Groups-> tab: Distribution list-> select the distribution list-> tab Settings-> link: Edit manage delegates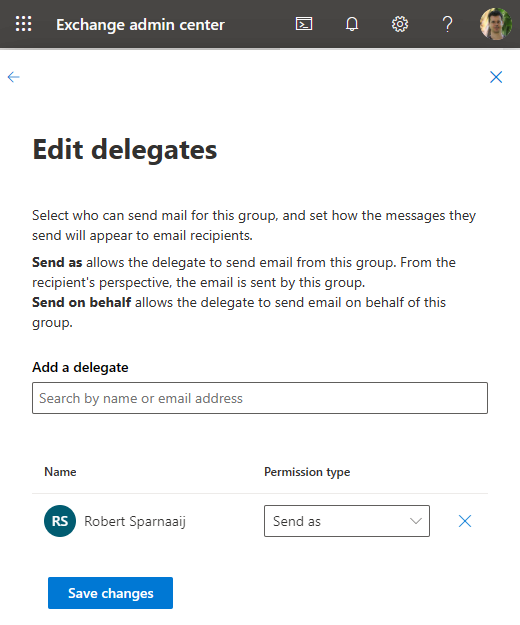
Setting Send As permissions on an object in the Exchange Admin Center (Microsoft 365).
- PowerShell (AKA; Exchange Management Shell or EMS);
- On-Premises
Add-ADPermission "Group Name" -user "Username" -ExtendedRights "Send As" - Microsoft 365
Add-RecipientPermission "Group Name" -AccessRights SendAs -Trustee "Username"
- On-Premises
Active Directory Users and Computers
Set your view to “Advanced Features” (via the View menu), open the Contact and select the Security tab. Now add the user who this alias should belong to and select the “Send As” permission.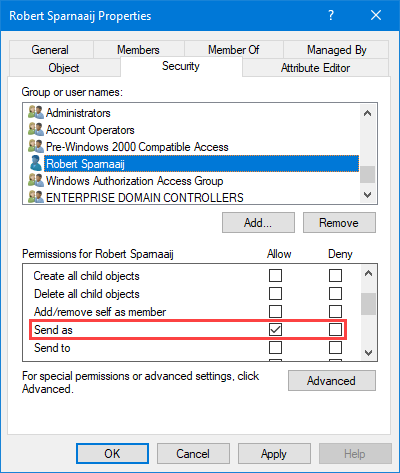
Setting Send As permissions on an object in Active Directory Users and Computers.
- Exchange Admin Center (ECP)
Note:
In Exchange On-Premises or Microsoft 365, you can also do this by creating a mail enabled Active Directory Contact with the alias address as its “External E-mail Address” and create an Exchange Transport Rule to deliver it to the user’s mailbox. To set the “Send As” permissions on the Contact for the owner of the alias, you can use the Active Directory Users and Computers, or the PowerShell methods as described above but then with the Contact object.
As you’ve changed the group membership of a user, the user must log off and then log on again for changes to take affect. Then, after the Offline Address Book has been regenerated on the Exchange server and been updated on the client, the user should be able to see this newly created Distribution Group in the Global Address List (GAL). Now the user can select this Distribution List and set it as the From field without the address being resolved to the primary address of his/her mailbox and without getting the “sent on behalf of” part on the receiver’s end.
Tip:
Let the user add this Distribution Group or Contact to his/her Contacts folder in Outlook so that you can hide it in the GAL.
Method 3: Use the Proxy Manager add-in
 Proxy Manager is a pure Outlook-level add-in solution that takes a similar approach to the above POP3 method and submitting the emails via SMTP but then without the need to create a dummy account for each address.
This has the following benefits over method 2 and method 4;
- It allows the Exchange administrator to continue to configure aliases directly on the user object/mailbox without the need to create additional AD Contacts for each alias.
- It allows the user to select an alias as if it was a separate account and optionally can specify a different Display Name for each address.
- No Exchange-level changes are required.
For the most popular Hosted Exchange solutions (like Microsoft 365 and GoDaddy), the add-in will work directly after installing. For on-premises solutions, the user only needs to specify the company’s SMTP server details and their own username and password.
More information: Proxy Manager
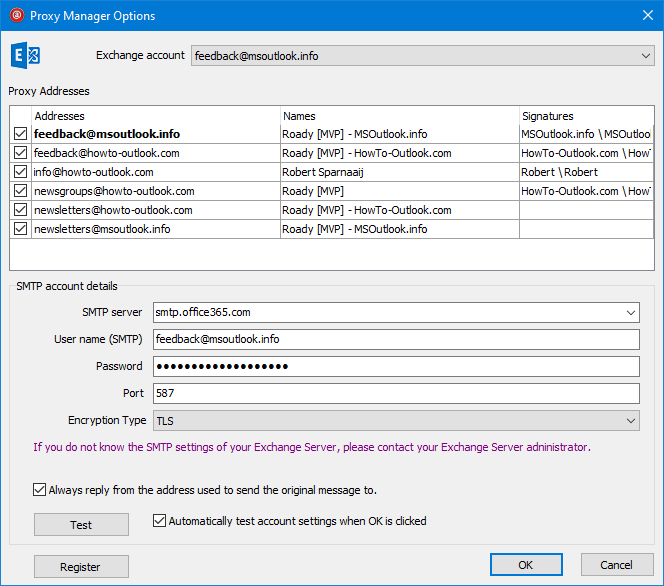
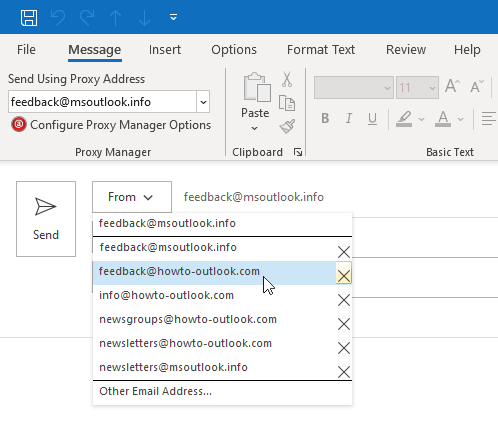
Proxy Manager provides you an easy way to send from one of your alias addresses. (Click here for more screenshots).
Method 4: Use the ChooseFrom and SmartReply add-in
 To deal with the alias dilemma a bit more structured and centralized, you can install a Transport Agent on the Exchange server and deploy an Outlook add-in to the users who need to send or sort mail from one of their configured aliases.
The combination of these tools from IvaSoft offer the following benefits over the previous 2 methods;
- It allows the Exchange administrator to continue to configure aliases directly on the user object/mailbox without the need to create additional AD Contacts for each alias.
- It allows the user to select an alias as if it was a separate account and also allows the user to sort incoming mail based on the alias specified by the external sender.
- There is no need to open up SMTP port 587 for the Exchange environment to the Internet for users who are working remotely to make this solution work as it uses the regular Outlook Anywhere connection (both “MAPI over HTTP” and “RPC over HTTP” can be used).
Author’s note:
While your initial impression of the IvaSoft website might not be so great, the tools themselves are and so is the technical support (from personal experience). The company really spends its time on developing their solutions and not so much on the design of their website.
ChooseFrom – Exchange Transport Agent
The ChooseFrom application from IvaSoft is a custom Transport Agent for Exchange which allows your users to send out messages with one of their configured alias addresses.
To do this, they can either specify this alias as the Reply-To address when composing a message or select it as a sending account when used in conjunction with the SmartReply Outlook add-in. ChooseFrom will then restamp the From address of the message with the address specified in the Reply-To field or by SmartReply.
More information: ChooseFrom for Exchange 2013/2016/2019
More information: ChooseFrom 365 for Exchange online/Office 365
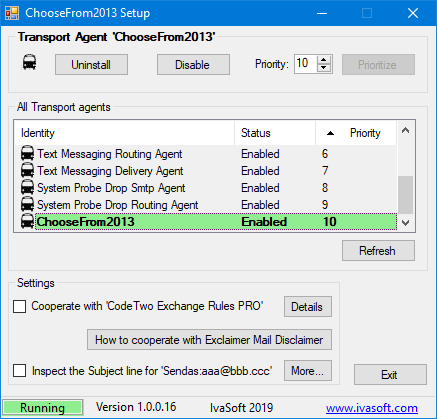
ChooseFrom is easy to install and doesn’t require a reboot of Exchange.
SmartReply – Outlook Add-in
SmartReply from IvaSoft is an Outlook add-in which allows you to see all your Exchange mailbox aliases as separate sending accounts. This enables you to send out messages with those aliases instead of only your primary address set by your Exchange administrator.
In addition, you can see which alias the message had been sent to (and sort your mail accordingly), automatically reply with that alias and specify a different signature for each.
More information: SmartReply for Outlook

SmartReply detects your Exchange aliases and allows you to choose from
them like if they were separate mail accounts.


