
 Do you have a mail account at Outlook.com (Hotmail), Gmail, Office 365, Yahoo!, AOL or iCloud?
This guide contains the settings and instructions how to configure Outlook with those email providers.
Account setting dialogs
 Most of the information can be set in the main “Add New E-mail Account” dialog but for either account you’ll also need to modify more advanced settings by pressing the “More Settings…” button.
The settings below are sorted by the dialogs that you need to access. If you are having problems finding out where to put in which information, look at the numbers in front of the settings and you can find them back in the screenshots section at the bottom of this document.
Outlook.com (Hotmail)
 Outlook.com accounts can be configured as Exchange accounts in Outlook.
When you are using the Mail app on your smartphone or tablet, you can configure your Outlook.com account via Exchange ActiveSync (EAS).
In addition to the above, Outlook.com also offers access via IMAP and POP3 in most countries.
Note:
When you have Two-Step Authentication enabled for your Microsoft account, you’ll need to use a special App Password instead of using your own password.
The Outlook app for iOS and Android doesn’t require an App Password as it supports Two-Step Authentication for Outlook.com accounts.
Outlook.com: Exchange (Outlook Anywhere)
Connecting to your Outlook.com mailbox hosted on the Outlook Mail platform is really easy as Outlook makes use of the Autodiscover service to automatically configure Outlook. In Outlook, simply select to add an account and use the Auto Account Setup method to configure your account. Manual configuration of the servers is not needed nor supported.
| 1 | Name: | The display name for your Outlook.com account. (most likely simply your name in full) |
|---|---|---|
| 2 | E-mail address: | Your Outlook.com address in full. When you have multiple addresses configured with your Outlook.com account, make sure you use your Primary alias and make sure that your primary alias is an @outlook, @hotmail, @live, @msn or @passport address. |
| 3 | Password: | Your password or an App Password when you have Two-Step Authentication enabled for your Microsoft Account. |
Outlook.com (Hotmail): Exchange ActiveSync (EAS)
To manually configure your Outlook.com account in the Mail app on a smartphone or tablet, use the following settings.
| 1 | Your Name: | The display name you’d like others to see. |
|---|---|---|
| 2 | E-mail Address: | Your main address of the Microsoft Account in full (yourname@hotmail.com, yourname@live.com or yourname@outlook.com) |
| 3 | Mail server: | eas.outlook.com m.outlook.com m.hotmail.com |
| 4 | User Name: | Your main address of the Microsoft Account in full (yourname@hotmail.com, yourname@live.com or yourname@outlook.com) |
| 5 | Password: | Your Microsoft Account password or an App Password when you have Two-Step Authentication enabled for your Microsoft Account. |
Outlook.com (Hotmail): IMAP
Add New E-mail Account dialog (screenshot)
| 1 | Your Name: | The display name you’d like others to see. |
|---|---|---|
| 2 | E-mail Address: | Your main address of the Microsoft Account in full (yourname@hotmail.com, yourname@live.com or yourname@outlook.com) |
| 3 | Account Type: | IMAP |
| 4 | Incoming mail server: | outlook.office365.com |
| 5 | Outgoing mail server: | smtp.office365.com |
| 6 | User Name: | Your main address of the Microsoft Account in full (yourname@hotmail.com, yourname@live.com or yourname@outlook.com) |
| 7 | Password: | Your Microsoft Account password or an App Password when you have Two-Step Authentication enabled for your Microsoft Account and your version of Outlook doesn’t support that. |
| 8 | Remember password | optional |
| 9 | Require logon using Secure Password Authentication (SPA) | disabled |
More Settings: Outgoing Server tab (screenshot)
| 10 | My outgoing server (SMTP) requires authentication: | enabled |
|---|---|---|
| 11 | Use same settings as my incoming mail server: | enabled |
More Settings: Advanced tab (screenshot)
| 12 | Incoming server (IMAP): | 993 |
|---|---|---|
| 13 | Use the following type of encrypted connection: | TLS |
| 14 | Outgoing server (SMTP): | 587 |
| 15 | Use the following type of encrypted connection: | STARTTLS |
Outlook.com (Hotmail): POP3
Add New E-mail Account dialog (screenshot)
| 1 | Your Name: | The display name you’d like others to see. |
|---|---|---|
| 2 | E-mail Address: | Your main address of the Microsoft Account in full (yourname@hotmail.com, yourname@live.com or yourname@outlook.com) |
| 3 | Account Type: | POP3 |
| 4 | Incoming mail server: | outlook.office365.com |
| 5 | Outgoing mail server: | smtp.office365.com |
| 6 | User Name: | Your main address of the Microsoft Account in full (yourname@hotmail.com, yourname@live.com or yourname@outlook.com) |
| 7 | Password: | Your Microsoft Account password or an App Password when you have Two-Step Authentication enabled for your Microsoft Account and your version of Outlook doesn’t support that. |
| 8 | Remember password | optional |
| 9 | Require logon using Secure Password Authentication (SPA) | disabled |
More Settings: Outgoing Server tab (screenshot)
| 10 | My outgoing server (SMTP) requires authentication: | enabled |
|---|---|---|
| 11 | Use same settings as my incoming mail server: | enabled |
More Settings: Advanced tab (screenshot)
| 12 | Incoming server (POP3): | 995 |
|---|---|---|
| 13 | Use the following type of encrypted connection: | TLS |
| 14 | Outgoing server (SMTP): | 587 |
| 15 | Use the following type of encrypted connection: | STARTTLS |
| 16 | Leave a copy of messages on the server | optional |
Outlook.com (Hotmail): Outlook Connector
The Outlook Hotmail Connector is no longer supported nor needed to connect to your Outlook.com account. Outlook.com accounts can be configured as Exchange accounts in Outlook 2007 and later. Previous versions of Outlook can use IMAP or POP3.
Gmail
 GMail offers access via IMAP and POP3 but if you want to use POP3, you must first enable this. IMAP should already be enabled by default for all accounts.
To enable POP3, logon to your Gmail account and press Settings at the top of your screen. In the new page that load click “Forwarding and POP/IMAP”.
Note:
You’ll need to set Gmail’s security settings to allow for Basic Authentication (less secure apps) or enable 2-Step Verification in order to connect to Gmail via Outlook (and many other email applications). Failure to do so will result in repeated password prompts and Send/Receive errors (0x800CCC0E)
Gmail: IMAP
Add New E-mail Account dialog (screenshot)
| 1 | Your Name: | The display name you’d like others to see. |
|---|---|---|
| 2 | E-mail Address: | your Gmail address in full (yourname@gmail.com or yourname@yourdomain.com when using Gmail Apps) |
| 3 | Account Type: | IMAP |
| 4 | Incoming mail server: | imap.gmail.com |
| 5 | Outgoing mail server: | smtp.gmail.com |
| 6 | User Name: | your Gmail address in full (yourname@gmail.com or yourname@yourdomain.com when using Gmail Apps) |
| 7 | Password: | Your Gmail password or an App Password when you have 2-Step Verification enabled for your Google Account and your version of Outlook doesn’t support that. |
| 8 | Remember password | optional |
| 9 | Require logon using Secure Password Authentication (SPA) | disabled |
More Settings: Outgoing Server tab (screenshot)
| 10 | My outgoing server (SMTP) requires authentication: | enabled |
|---|---|---|
| 11 | Use same settings as my incoming mail server: | enabled |
More Settings: Advanced tab (screenshot)
| 12 | Incoming server (IMAP): | 993 |
|---|---|---|
| 13 | Use the following type of encrypted connection: | SSL |
| 14 | Outgoing server (SMTP): | 465 (SSL) or 587 (TLS) |
| 15 | Use the following type of encrypted connection: | SSL or TLS |
Tips!
Don’t set Outlook to save the sent items in the Sent Items folder of the IMAP account or you’ll end up with duplicates. When you send via the SMTP server of Gmail, then your Sent Items are automatically placed there. If you are restricted to using another SMTP server (from your ISP for example), then you would still need to configure your account to save to the Sent Items folder.
Additionally, don’t subscribe to the All Mail folder as this will double your pst- or ost-file from your Gmail account in size. For more information and workarounds see: Gmail accounts and disproportionally large pst-files.
Gmail: POP3
Add New E-mail Account dialog (screenshot)
| 1 | Your Name: | The display name you’d like others to see. |
|---|---|---|
| 2 | E-mail Address: | your Gmail address in full (yourname@gmail.com or yourname@yourdomain.com when using Google Apps) |
| 3 | Account Type: | POP3 |
| 4 | Incoming mail server: | pop.gmail.com |
| 5 | Outgoing mail server: | smtp.gmail.com |
| 6 | User Name: | your Gmail address in full (yourname@gmail.com or yourname@yourdomain.com when using Google Apps) |
| 7 | Password: | Your Gmail password or an App Password when you have 2-Step Verification enabled for your Google Account and your version of Outlook doesn’t support that. |
| 8 | Remember password | optional |
| 9 | Require logon using Secure Password Authentication (SPA) | disabled |
More Settings: Outgoing Server tab (screenshot)
| 10 | My outgoing server (SMTP) requires authentication: | enabled |
|---|---|---|
| 11 | Use same settings as my incoming mail server: | enabled |
More Settings: Advanced tab (screenshot)
| 12 | Incoming server (POP3): | 995 |
|---|---|---|
| 13 | Use the following type of encrypted connection: | SSL |
| 14 | Outgoing server (SMTP): | 465 (SSL) or 587 (TLS) |
| 15 | Use the following type of encrypted connection: | SSL or TLS |
| 16 | Leave a copy of messages on the server | disabled (Gmail holds a copy already by default) |
Office 365 for Business (Exchange Online)
 When you are using a hosted Exchange Online account at Office 365 for Business, the main connection method would be an actual Exchange connection via Outlook Anywhere (also known as “RPC over HTTP” or “MAPI over HTTP”).
Office 365 also offers EAS connectivity but that is only recommended for mobile devices such as smartphones and tablets which are using an Outlook app or another Mail app which offers EAS support.
IMAP and POP3 is also offered but that is only recommended when you have a very specific need for it (like server-level automation) or not using Outlook.
Office 365: Exchange (Outlook Anywhere)
Connecting to your Exchange Online mailbox is really easy as Outlook makes use of the Autodiscover service to automatically configure Outlook. In Outlook, simply select to add an account and use the Auto Account Setup method to configure your account. Manual configuration is not supported.
| 1 | Name: | The display name which has been configured by your Exchange administrator. (most likely simply your name in full) |
|---|---|---|
| 2 | E-mail address: | Your email address in full. |
| 3 | Password: | Your password or an App Password when you have Multi-factor Authentication enabled for your account and are using Outlook 2007 or Outlook 2010. Outlook 2013, Outlook 2016, Outlook 2019 and Outlook for Office 365 offer native Multi factor Authentication for Office 365. |
Note to domain owners:
Make sure that you have set all the required DNS records for your domain. For Autodiscover, you’ll need to create a CNAME record called “autodiscover” in your public DNS zone and point it to “autodiscover.outlook.com”. You can verify your configuration in the Office 365 admin center.
Office 365: EAS
The screen depends on the app that you use. Below is an overview of the required fields to fill out if automatic configuration is not supported by your app.
| 1 | Your Name: | The display name you’d like others to see. |
|---|---|---|
| 2 | E-mail Address: | Your email address in full. |
| 3 | Mail server: | outlook.office365.com |
| 4 | User Name: | Your email address in full. |
| 5 | Domain: | Leave this field empty when your app has this field. |
| 6 | Password: | Your password or an App Password when you have Multi-factor Authentication enabled for your account. |
Office 365: IMAP
Add New E-mail Account dialog (screenshot)
| 1 | Your Name: | The display name you’d like others to see. |
|---|---|---|
| 2 | E-mail Address: | Your email address in full. |
| 3 | Account Type: | IMAP |
| 4 | Incoming mail server: | outlook.office365.com |
| 5 | Outgoing mail server: | smtp.office365.com |
| 6 | User Name: | Your email address in full. |
| 7 | Password: | Your password or an App Password when you have Multi-factor Authentication enabled for your account. |
| 8 | Remember password | optional |
| 9 | Require logon using Secure Password Authentication (SPA) | disabled |
More Settings: Outgoing Server tab (screenshot)
| 10 | My outgoing server (SMTP) requires authentication: | enabled |
|---|---|---|
| 11 | Use same settings as my incoming mail server: | enabled |
More Settings: Advanced tab (screenshot)
| 12 | Incoming server (IMAP): | 993 |
|---|---|---|
| 13 | Use the following type of encrypted connection: | TLS |
| 14 | Outgoing server (SMTP): | 587 |
| 15 | Use the following type of encrypted connection: | STARTTLS |
Office 365: POP3
Add New E-mail Account dialog (screenshot)
| 1 | Your Name: | The display name you’d like others to see. |
|---|---|---|
| 2 | E-mail Address: | Your email address in full. |
| 3 | Account Type: | POP3 |
| 4 | Incoming mail server: | outlook.office365.com |
| 5 | Outgoing mail server: | smtp.office365.com |
| 6 | User Name: | Your email address in full. |
| 7 | Password: | Your password or an App Password when you have Multi-factor Authentication enabled for your account. |
| 8 | Remember password | optional |
| 9 | Require logon using Secure Password Authentication (SPA) | disabled |
More Settings: Outgoing Server tab (screenshot)
| 10 | My outgoing server (SMTP) requires authentication: | enabled |
|---|---|---|
| 11 | Use same settings as my incoming mail server: | enabled |
More Settings: Advanced tab (screenshot)
| 12 | Incoming server (POP3): | 995 |
|---|---|---|
| 13 | Use the following type of encrypted connection: | TLS |
| 14 | Outgoing server (SMTP): | 587 |
| 15 | Use the following type of encrypted connection: | STARTTLS |
| 16 | Leave a copy of messages on the server | optional |
Yahoo!
 Yahoo! offers IMAP and POP3 access.
Both protocols are enabled by default for your account and can’t be disabled. There is no separate connector available to sync your Contacts or Calendar that you may have stored in your web based mailbox but you can export them online and import them into Outlook.
Note:
You’ll need to set Yahoo!’s security settings to allow less secure access to your inbox or enable Two-Step Verification in order to connect to Yahoo! via Outlook (and many other email applications). Failure to do so will result in repeated password prompts and Send/Receive errors (0x800CCC92)
Yahoo!: IMAP
Add New E-mail Account dialog (screenshot)
| 1 | Your Name: | The display name you’d like others to see. |
|---|---|---|
| 2 | E-mail Address: | Your Yahoo! address in full (yourname@yahoo.com) |
| 3 | Account Type: | IMAP |
| 4 | Incoming mail server: | imap.mail.yahoo.com |
| 5 | Outgoing mail server: | smtp.mail.yahoo.com |
| 6 | User Name: | Your Yahoo! address in full (yourname@yahoo.com) |
| 7 | Password: | Your Yahoo! password or an App Password when you have Two-Step Verification enabled for your Yahoo! Account. |
| 8 | Remember password | optional |
| 9 | Require logon using Secure Password Authentication (SPA) | disabled |
More Settings: Outgoing Server tab (screenshot)
| 10 | My outgoing server (SMTP) requires authentication: | enabled |
|---|---|---|
| 11 | Use same settings as my incoming mail server: | enabled |
More Settings: Advanced tab (screenshot)
| 12 | Incoming server (IMAP): | 993 |
|---|---|---|
| 13 | Use the following type of encrypted connection: | SSL |
| 14 | Outgoing server (SMTP): | 587 (TLS) or 465 (SSL) |
| 15 | Use the following type of encrypted connection: | TLS (if not available: SSL) |
Yahoo!: POP3
Add New E-mail Account dialog (screenshot)
| 1 | Your Name: | The display name you’d like others to see. |
|---|---|---|
| 2 | E-mail Address: | Your Yahoo! address in full (yourname@yahoo.com) |
| 3 | Account Type: | POP3 |
| 4 | Incoming mail server: | pop.mail.yahoo.com |
| 5 | Outgoing mail server: | smtp.mail.yahoo.com |
| 6 | User Name: | Your Yahoo! address in full (yourname@yahoo.com) |
| 7 | Password: | Your Yahoo! password or an App Password when you have Two-Step Verification enabled for your Yahoo! Account. |
| 8 | Remember password | optional |
| 9 | Require logon using Secure Password Authentication (SPA) | disabled |
More Settings: Outgoing Server tab (screenshot)
| 10 | My outgoing server (SMTP) requires authentication: | enabled |
|---|---|---|
| 11 | Use same settings as my incoming mail server: | enabled |
More Settings: Advanced tab (screenshot)
| 12 | Incoming server (POP3): | 995 |
|---|---|---|
| 13 | Use the following type of encrypted connection: | SSL |
| 14 | Outgoing server (SMTP): | 587 (TLS) or 465 (SSL) |
| 15 | Use the following type of encrypted connection: | TLS (if not available: SSL) |
| 16 | Leave a copy of messages on the server | optional |
AOL
 AOL offers both POP3 and IMAP access. It makes a difference whether you have an AOL address or an AIM address.
Both protocols are enabled by default for your account and can’t be disabled. There is no separate connector available to sync your Contacts or Calendar that you may have stored in your web based mailbox but you can export them online and import them into Outlook.
AOL: IMAP
Add New E-mail Account dialog (screenshot)
| 1 | Your Name: | The display name you’d like others to see. |
|---|---|---|
| 2 | E-mail Address: | your AOL or AIM address in full (yourname@aol.com or yourname@aim.com) |
| 3 | Account Type: | IMAP |
| 4 | Incoming mail server: | imap.aol.com or imap.aim.com |
| 5 | Outgoing mail server: | smtp.aol.com or smtp.aim.com |
| 6 | User Name: | your AOL or AIM screen name (so without @aol.com or @aim.com behind it) |
| 7 | Password: | Your AOL or AIM password |
| 8 | Remember password | optional |
| 9 | Require logon using Secure Password Authentication (SPA) | disabled |
More Settings: Outgoing Server tab (screenshot)
| 10 | My outgoing server (SMTP) requires authentication: | enabled |
|---|---|---|
| 11 | Use same settings as my incoming mail server: | enabled |
More Settings: Advanced tab (screenshot)
| 12 | Incoming server (IMAP): | 993 |
|---|---|---|
| 13 | Use the following type of encrypted connection: | SSL |
| 14 | Outgoing server (SMTP): | 587 |
| 15 | Use the following type of encrypted connection: | TLS |
AOL: POP3
Add New E-mail Account dialog (screenshot)
| 1 | Your Name: | The display name you’d like others to see. |
|---|---|---|
| 2 | E-mail Address: | your AOL or AIM address in full (yourname@aol.com or yourname@aim.com) |
| 3 | Account Type: | POP3 |
| 4 | Incoming mail server: | pop.aol.com or pop.aim.com |
| 5 | Outgoing mail server: | smtp.aol.com or smtp.aim.com |
| 6 | User Name: | your AOL or AIM screen name (so without @aol.com or @aim.com behind it) |
| 7 | Password: | Your AOL or AIM password |
| 8 | Remember password | optional |
| 9 | Require logon using Secure Password Authentication (SPA) | disabled |
More Settings: Outgoing Server tab (screenshot)
| 10 | My outgoing server (SMTP) requires authentication: | enabled |
|---|---|---|
| 11 | Use same settings as my incoming mail server: | enabled |
More Settings: Advanced tab (screenshot)
| 12 | Incoming server (POP3): | 995 |
|---|---|---|
| 13 | Use the following type of encrypted connection: | SSL |
| 14 | Outgoing server (SMTP): | 587 |
| 15 | Use the following type of encrypted connection: | TLS |
| 16 | Leave a copy of messages on the server | optional |
iCloud
 Apple only offers IMAP access to their iCloud service. Via the iCloud Control Panel, you can automate the configuration and also sync your iCloud Contacts, Calendar and Tasks folders with Outlook.
iCloud – IMAP
Add New E-mail Account dialog (screenshot)
| 1 | Your Name: | The display name you’d like others to see. |
|---|---|---|
| 2 | E-mail Address: | your iCloud email address in full (yourname@icloud.com) |
| 3 | Account Type: | IMAP |
| 4 | Incoming mail server: | imap.mail.me.com |
| 5 | Outgoing mail server: | smtp.mail.me.com |
| 6 | User Name: | the name part of your iCloud address (so without @icloud.com behind it) |
| 7 | Password: | Your iCloud password or an App Password when you have Two-Step Verification enabled for your Apple ID. |
| 8 | Remember password | optional |
| 9 | Require logon using Secure Password Authentication (SPA) | disabled |
More Settings: Outgoing Server tab (screenshot)
| 10 | My outgoing server (SMTP) requires authentication: | enabled |
|---|---|---|
| 11 | Use same settings as my incoming mail server: | enabled |
More Settings: Advanced tab (screenshot)
| 12 | Incoming server (IMAP): | 993 |
|---|---|---|
| 13 | Use the following type of encrypted connection: | SSL/TLS |
| 14 | Outgoing server (SMTP): | 587 |
| 15 | Use the following type of encrypted connection: | STARTTLS |
iCloud – Contacts , Calendar and Tasks
Synching your iCloud Contacts, Calendar and Tasks folder with Outlook is only possible when you install the iCloud Control Panel application which also install an Outlook add-in.
In the iCloud Control Panel, you can then select the option to sync Mail, Contacts, Calendars, and Tasks with Outlook. No further configuration within Outlook itself is required.
Tool Tip!
The iCloud add-in creates an additional iCloud folder set within Outlook with its own Contacts, Calendar and Tasks folder rather than using Outlook default ones. This limits some core functionality features in Outlook such as not being able to see your upcoming appointments in the To-Do Bar.
CodeTwo Sync iCloud takes care of these limitations by fully syncing your Outlook default folders with the iCloud folders and back. You can then be sure that your Outlook, iPhone, iPad and other Apple devices remain up-to-date while you can continue to work with Outlook as you always did.
Screenshots
 Below you’ll find screenshots of the account configuration screens. The numbers in the screenshots correspond with the numbers in the tables with the settings above.
The screenshots are for the manual configuration process of POP3, IMAP and Outlook Connector accounts.

After setting the main account settings, press the More Settings… button

Configure Authentication
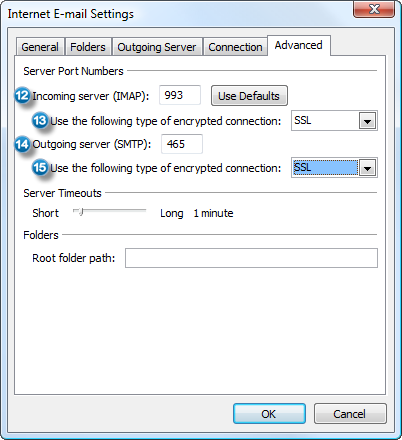
Advanced IMAP settings
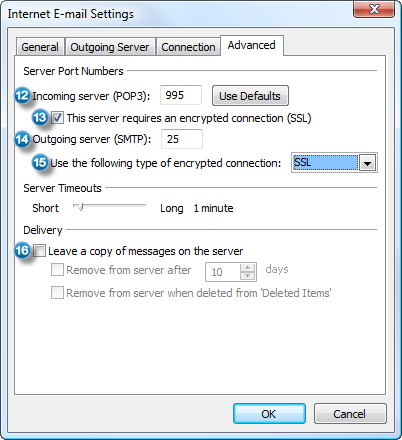
Advanced POP3 settings

