
 When you have permissions to “Send As” or “On Behalf Of” another mailbox or Mail Enabled Distribution Group in an Exchange environment, you can use the From field in Outlook to specify this.
However, in some situations, it is not uncommon that you need to send out as this mailbox or distribution group more often than from your own name. For instance, when you work in support and need to send out from the central support address rather than your own or when you represent a manager.
While you can manually specify the From field to send from each time you need to send out as that address, when needing to do that becomes the rule rather than the exception, it’s time to automate things.
This guide instructs you how you can cope with the above scenarios via built-in Outlook account configuration options and settings but also provides a code sample to set the From address programmatically.
- Method 1: Change default to Delegate or Shared mailbox
- Method 2: Configure an additional Exchange account
- Method 3: SetFromAddress macro
- Method 4: Add-in solution
Method 1: Change default to Delegate or Shared mailbox
 When you want to change the default to another mailbox to which you also have Full Access permissions, then you can configure your mail profile with that mailbox instead and add your own as a delegate mailbox.
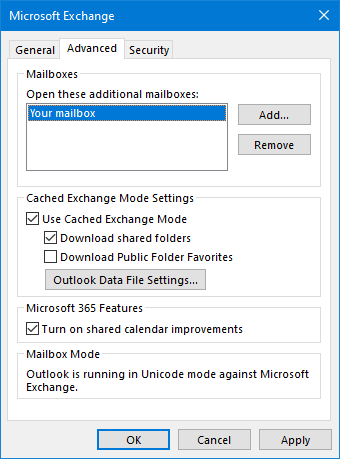
The result would be basically the reverse of what you have now; Your own mailbox configured as the Exchange account and the other mailbox added as an opened additional mailbox.
Ask your Exchange administrator if you don’t know whether you have been granted Full Access permissions on the other mailbox.

Set the delegate/shared mailbox as the main mailbox and add your own.
(click here and here to see both dialog boxes in full)
Method 2: Configure an additional Exchange account
 When you have Full Access permissions on the other mailbox, then you can also configure that mailbox as an additional Exchange account rather than adding it as a Delegate mailbox.
By adding it as an additional account, Outlook will automatically set the From field based on the mailbox that you are in. So when you create a new email or reply to an email from the additional mailbox, the From field would be set to that mailbox. When you were to do this from your own mailbox, your own address is being used.

Add the delegate/shared mailbox as an additional Exchange account in Outlook.
Note:
This configuration is not supported when you also act as a Calendar delegate for the secondary mailbox or when the mailbox has been added via Auto-Mapping. In case of the last, you can ask your Exchange administrator to remove the Auto-Mapping property.
Method 3: SetFromAddress macro
 The above solutions only work when you also have Full Access permissions to the mailbox and don’t work at all for Distribution Groups. As you’ve noticed, they also come with requirements and restrictions of their own.
The SetFrom macro works for any address that you have Send As or Send on Behalf Of permissions for.
You can even make this work with the “Reading Pane Reply” feature by uncommenting 3 lines as indicated in the provided code.
Quick Install
Use the following instructions to configure the macro in Outlook;
- Download this code-file (
setfromaddress.zip) or copy the code below. - Open the VBA Editor (keyboard shortcut ALT+F11)
- Extract the zip-file and copy the text from the
SetFromAddress.txtfile. - Paste the code in the ThisOutlookSession module of the VBA Editor.
- Modify the address in the code. Currently it is set to: delegate@domain.com
Important! Make sure you leave the surrounding quotes in the code! - Sign your code so you won’t get any security prompts and the macro won’t get disabled.
- Restart Outlook.
Now when you create a new message, the From address is set automatically to your specified address.

ThisOutlookSession module in the VBA Editor.
Macro code
The following code is contained in the zip-file referenced in the Quick Install. You can use the code below for review or manual installation.
'================================================================================
'Description: Outlook macro to automatically set a different
'             From address.
'
'Comment: You can set the email address at the bottom of the code.
'         Uncomment the myOlExp_InlineResponse sub to also make it
'         work with the Reading Pane reply feature of Outlook 2013/2016/2019/365.
'
' author : Robert Sparnaaij
' version: 1.1
' website: https://www.howto-outlook.com/howto/setfromaddress.htm
'================================================================================

Dim WithEvents objInspectors As Outlook.Inspectors
Dim WithEvents objMailItem As Outlook.MailItem
Dim WithEvents myOlExp As Outlook.Explorer

Private Sub Application_Startup()
    Initialize_handler
End Sub

Public Sub Initialize_handler()
    Set objInspectors = Application.Inspectors
    Set myOlExp = Application.ActiveExplorer
End Sub

Private Sub objInspectors_NewInspector(ByVal Inspector As Inspector)
    If Inspector.CurrentItem.Class = olMail Then
        Set objMailItem = Inspector.CurrentItem
        If objMailItem.Sent = False Then
            Call SetFromAddress(objMailItem)
        End If
    End If
End Sub

'Uncomment the next 3 lines to enable Outlook 2013/2016/2019/365 Reading Pane Reply
'Private Sub myOlExp_InlineResponse(ByVal objItem As Object)
'    Call SetFromAddress(objItem)
'End Sub

Public Sub SetFromAddress(oMail As Outlook.MailItem)
    ' Set your preferred default From address below.
    ' Exchange permissions determine if it is actually stamped
    ' as "Sent On Behalf Of" or "Sent As".
    ' The address is not properly updated for the InlineResponse
    ' feature in Outlook 2013/2016/365. This is only a visual bug.
    oMail.SentOnBehalfOfName = "delegate@domain.com"
End Sub
Modification 1: Reading Pane Reply
To make it work with the Reading Pane Reply feature of Outlook, remove the single quotes in front of the following lines in the code:
Private Sub myOlExp_InlineResponse(ByVal objItem As Object)
    Call SetFrom(objItem)
End Sub
The changed address might not always display in the Reading Pane but this is only a visual bug; Outlook does set the From address correctly.
Modification 2: Only change it for a specific account
If you only want to set the From field when using a specific account (like your business account) but not other accounts (like your private account), then you can change the following line;
oMail.SentOnBehalfOfName = "delegate@domain.com"
into;
If Instr (1, oMail.SendUsingAccount, "@domain.com", vbTextCompare) > 0 Then
      oMail.SentOnBehalfOfName = delegate@domain.com
End If
Make sure you change both @domain.com and delegate@domain.com into your account name and custom From email address respectively.
By default, your account name is your email address and specifying your domain name is sufficient for the code to work. This also allows you to easily share it amongst your colleagues.
Method 4: Add-in solution
 Another approach would to do this via an add-in. VBOffice SAM allows you to create rules which automatically set the “Send As” or “Send on Behalf Address” based on your criteria.
This can be combined with a different default signature when sending as that address so you are signing it as your manager or the centralized mailbox rather than with your own personal signature.

