 There are several guides containing PowerShell scripts on HowTo-Outlook.com. PowerShell is a powerful scripting language which can be used by many applications including Outlook and Exchange. For end-user usage, it can be seen as the successor of vbs and batch scripts.
PowerShell scripts are easy to use but there are a couple of things to be aware of, especially when it is the first time you use such scripts.
This guide contains frequently asked questions regarding the use of PowerShell scripts and some additional tips and tricks to get you started.
- Why doesn’t my PowerShell script execute via a double click like a vbs or bat script?
- How do I open PowerShell?
- How can I easily execute a PowerShell script?
- Security Error “not digitally signed” for downloaded scripts
- Dot-Source scripts within your PowerShell Profile
- Creating a Scheduled Task which executes a PowerShell script
- Download and install PowerShell modules for Microsoft 365
Why doesn’t my PowerShell script execute via a double click like a vbs or bat script?
 The default action when double clicking on on a ps1-file is to open it in Notepad or another text or script/code editor which you may have installed such as Visual Studio Code.
This is mainly done for security reasons and to prevent you from accidentally executing scripts.
Partly it is also a convenience feature to easily verify or edit the code as many scripts are not manually executed but automated via Scheduled Tasks, Logon Scripts or have been implemented as callable functions (like Get and Set commands).
There still are other methods available which allow you to easily run a PowerShell script which is discussed later below.
How do I open PowerShell?
 A quick way to open PowerShell is to right click on the Start Menu icon and choose; Windows PowerShell.
In Windows 11, this entry has been replaced with Windows Terminal which opens a Windows PowerShell session by default. Windows Terminal is also available for Windows 10.
If the option isn’t listed, just type “PowerShell” directly after opening the Start Menu or within the Search box.
Yet another alternative is to scroll down within the Start Menu to the Windows PowerShell folder and start it from there.
However, in some cases it is not needed to first manually start PowerShell to execute a script (see the next entry).

Right click on the Start Menu to quickly open PowerShell.
How can I easily execute a PowerShell script?
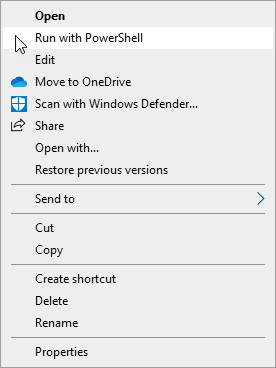
 The easiest way to execute a PowerShell, script which allows for direct execution, is to right click on them and choose; Run with PowerShell.

If you only have the code, for instance from a webpage, then you can often simply copy/paste the code directly into a PowerShell window as well.
If the script needs to be loaded first or requires additional parameters, you can also use one of the following methods;
Method 1: File menu (Windows 10)
- Browse to the location you stored the ps1-file in File Explorer and choose;
File-> Open Windows PowerShell - Type (part of) the name of the script.
- Press TAB to autocomplete then name.
- Note: Do this even when you typed the name in full. This is because files within PowerShell need to start with a dot-slash ( .\ ) and pressing TAB will add that. Obviously, you can also manually type .\ in front of your filename but using TAB might be more convenient. The alternative is to type the file path in full.
- Press ENTER to execute the script.

Method 2: Open in Terminal (Windows 11)
- Browse to the location you stored the ps1-file in File Explorer, right click on an empty space within the folder and choose; Open in Terminal.
- As an alternative, go up 1 folder level so you can actually right click on the folder itself and choose; Open in Terminal.
- Type (part of) the name of the script.
- Press TAB to autocomplete then name.
- Note: Do this even when you typed the name in full. This is because files within PowerShell need to start with a dot-slash ( .\ ) and pressing TAB will add that. Obviously, you can also manually type .\ in front of your filename but using TAB might be more convenient. The alternative is to type the file path in full.
- Press ENTER to execute the script.
Method 3: Drag & drop
- Open a PowerShell window
- Drag & drop the script from within File Explorer or from your Desktop into the PowerShell window.
- Verify that the PowerShell window is active (click on the Title bar to make sure).
- Press ENTER to execute the script.
Security Error “not digitally signed” for downloaded scripts
 When you try to execute a PowerShell script you’ve downloaded from the Internet, you may get errors similar to this;
Or even this;
In most cases, this can be solved by adjusting 2 things;
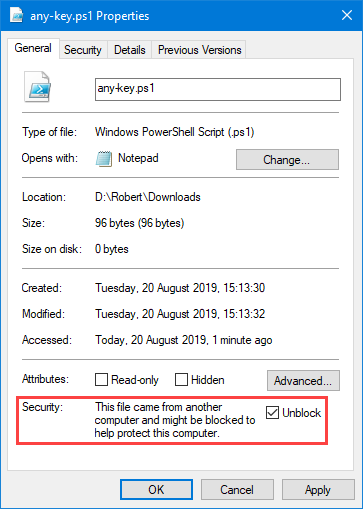
- Unblock the script
Right-click the script and choose Properties. In the Properties dialog, if available, select the Unblock checkbox and press OK. - Set-ExecutionPolicy
If it still doesn’t work now, type the following in a PowerShell window;Set-ExecutionPolicy -ExecutionPolicy RemoteSigned -Scope CurrentUser
If you can’t change it, your administrator most likely have restricted the usage of PowerShell scripts. For more info, also see; Set-ExecutionPolicy.

After downloading a script, don’t forget to unblock it.
Dot-Source scripts within your PowerShell Profile
 If the script contains function which you need on a regular basis, then you can “dot-source” the script by adding a reference to it in your PowerShell Profile.
By dot-sourcing the script, the script automatically loads (but not executes!) when you start PowerShell. This means that you can directly type the name of the PowerShell cmdlet (function) that is contained within the script.
To dot-source a script within your PowerShell profile open PowerShell and type;notepad $profile
If Notepad prompts you that the file doesn’t exist and whether you want to create it choose “Yes”. If you get an error “The system cannot find the path specified.”, close Notepad and type the following command instead;New-Item -Path $profile -ItemType "file" -Force
Within Notepad, type a dot, then a space and then the full path to the script. For example;. "C:\Scripts\MyScript.ps1"
Save and close Notepad and then restart PowerShell. You can now directly type any function contained within the MyScript.ps1 file.

You can dot-source multiple scripts in your PowerShell Profile.
Note:
By default, your PowerShell Profile is stored in a file called Microsoft.PowerShell_profile.ps1.
To find out its exact location use the following PowerShell command;Get-Item $profile
Creating a Scheduled Task which executes a PowerShell script
 To run a PowerShell script automatically via Scheduled Task, you’ll need to configure it to run PowerShell and add the script as an argument.
- Open Task Scheduler.
Just type “Task Scheduler” directly after opening the Start Menu or within the Search box - From the Actions pane on the right choose: Create Basic Task…
- Specify a name for the Scheduled Task and press Next.
- Select the trigger for the task to run. For instance “Daily” or “When I log on”.
- For the action select: Start a program.
- Fill out the Start a program form in the following way;
- Program/script: PowerShell
- Add arguments (optional): Path to your PowerShell script including any command line switches
- Start in (optional): <leave blank>
- Click Next to get an overview of your newly created Task and then click Finish to actually create it.

Tip!
You can actually also fill out everything within the Program/script field. Upon clicking Next, Task Scheduler will detect that you have arguments specified and will prompt you whether or not it should correct it.
Download and install PowerShell modules for Microsoft 365
 When you are working with PowerShell scripts for Microsoft 365 (previously known as Office 365), you’ll first need to install the PowerShell modules for each service and connect to that service before you can execute any scripts.
Some of these modules need to be downloaded and installed separately but most can be installed directly via a PowerShell command as well.
Below is an overview of the most common modules;
- Exchange
- V3 (Recommended)
Install-Module -Name ExchangeOnlineManagement -Scope CurrentUser - V1 (deprecated)
- Logon to the Exchange Admin Center (Classic)
- Select Hybrid
- Click the “configure” button for the Exchange Online PowerShell Module.
This direct link might also work. - From the Start Menu choose; Microsoft Exchange Online PowerShell Module
- V3 (Recommended)
- SharePoint
Install-Module -Name Microsoft.Online.SharePoint.PowerShell -Scope CurrentUser - Teams and Skype for Business
Install-Module -Name MicrosoftTeams -Scope CurrentUser - Azure AD
V2 (Graph);Install-Module -Name AzureAD -Scope CurrentUser
V1 (Legacy);Install-Module -Name MSOnline -Scope CurrentUser - Microsoft Graph
Install-Module -Name Microsoft.Graph -Scope CurrentUser
To see which modules you have installed use;Get-InstalledModule
To see which modules are available on your computer use;Get-Module –ListAvailable
Updating the modules can be done via;Update-Module –Name <modulename> –Scope CurrentUser
Note:
In case you are getting errors about no repository being available, register it in the following way;Register-PSRepository -Default -InstallationPolicy Trusted -Verbose
To verify that the PSGallery is available use;Get-PSRepository


