
 Calculating time spent on and creating reports of Meeting, Tasks and Journal items is quite a common request of people who plan and record everything in Outlook.
Sadly, the reporting features within Outlook are quite limited. While there is a duration field, Outlook cannot directly make calculations with that.
To make calculations within Outlook, you’ll need to create a custom macro. In this guide you’ll find the VBA-code needed to create such a macro. The macro calculates the total amount of time spent on the selected items and returns the answer in a message box.
If you need to create an actual report with more details, then you can make such reports with help of an export to Excel or by using a reporting add-in.
Tool Tip!  Need a full report? While the Excel method in this guide works for most situations, it is quite labor intensive to generate each time.
If you need to create reports from Outlook data on a regular basis, using VBOffice Reporter would be a more elegant approach and reports can be pre-configured and generated in an instant.
The reporting templates can be adjusted to match your company’s standard layout and formatting and include the company’s logo.
Method 1: TimeSpent macro
 The TimeSpent macro allows you to calculate the total amount of time spent on the selected items. These selected items can be Calendar, Task and Journal items of your choice.
Optionally, you can also let it calculate the sum of the recorded mileage for these items.

Just select your items and execute the macro to see the results.

For Tasks, the total work time is also reported.
Optionally you can get the total mileage result as well.
Quick Install
- Download this code-file (
timespent.zip) or copy the code below. - Open the VBA Editor (keyboard shortcut ALT+F11)
- Extract the zip-file and import the
TimeSpent.basfile via File-> Import…
If you copied the code paste it into a new module. - Optionally; set the ShowMileage variable to True to also report the total mileage recorded for the selected items.
- Sign your code so you won’t get any security prompts and the macro won’t get disabled.
- Add a button for easy access to the macro.
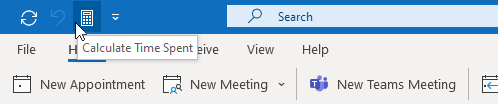
Add a button of the macro to the QAT for quick access to it.
Tips!
If you need to select items from a Calendar over a longer period of time, switching to a List view might make the selection process easier. However, realize that recurring meeting items will only be listed once and thus only counted once in a list view.
If you have a lot of items in a folder, applying a filter to your view might be helpful too. For instance, apply a filter based on time period and/or categories.
Macro code
The following code is contained in the zip-file referenced in the Quick Install. You can use the code below for review or manual installation.
Click in the area above and press CTR+A to select all. Press CTRL+C to copy the code.
Method 2: Using Excel
 By exporting the folder contents to Excel, we can make use of Excel’s calculation features which makes time calculations a breeze. With some additional filtering and columns formatting, you can create a report with the data you need.
Exporting
We start by exporting the folders contents to an Excel file in the following way;
- Open the Import and Export Wizard
- File-> Open & Export-> Import/Export
- Select: Export to a file
- Select: Comma Separated Values
- Select the Calendar, Tasks or Journal folder that you wish to export.
- Provide a file name and location for the exported file.
- The next screen will contain a “Map Custom Fields…” button. You can click on this button to remove the fields you do not need for your report.
In addition to the required fields below, the Subject, Categories and possibly Mileage fields are probably important fields to keep for creating and filtering your report as well;- Calendar: StartDate, StartTime, EndDate, EndTime
- Tasks: Total Work, ActualWork
- Journal: Duration
- Click on Finish to start the Export process. When exporting a Calendar or Tasks folder, you can set the export date range after pressing the Finish button.

When exporting the Calendar or Tasks folder, you can set a date range for recurring items.
Importing
After exporting the csv-file, you can import it in Excel in the following way;
- Open Excel.
- Select the Data tab.
- Click on: From Text/CSV.
- Select the file you exported in the previous step.
- After selecting the file;
- Excel for Microsoft 365
Press the Load button. - Previous Excel versions
Select: Delimited-> Next-> select “Comma” or “Tab” (depends on your Windows Regional settings)-> Next-> Finish
- Excel for Microsoft 365
Filtering
Once you’ve imported the file in Excel, you can apply some filtering to exclude data you don’t need for your calculations.
- Enable the Filter option
- Home-> group: Editing-> button Sort & Filter-> Filter
- Click on the Categories header to select only the categorized items needed for your report. You can of course also apply (additional) filters for other columns.
- Once filtered, select and copy and paste the results to a new sheet in Excel.
You can repeat this filtering and copy/paste method if you need to create additional reports from the same original data.

Table in Excel with a filter applied to the Categories column.
Tip!
If you only have a small amount of items, simply removing the rules you don’t need might be quicker. When you have a large amount of items and/or need to create multiple reports from the same set of data, the filtering method is recommended.
Calendar calculations and column formatting
For the Calendar calculations, add a Duration column and for making the calculations, we’ll assume the following layout in Excel;

- To calculate the Duration field, type the following formula in cell F2;
=(D2+E2)-(B2+C2) - To get a workable Duration value we must format the cell;
- Right click in the F2 cell.
- Choose: Format Cells…
- In the Category list on the left side select: Custom
- In the Type field, remove “General” and type;
[hh]:mm - Press OK to close the dialog.
- Going by the example above, the F2 field should now contain the value:
02:45
- Use the drag method in Excel (square in the right bottom corner of the F2 field) to automatically fill our the formulas for the other columns.
You should now see the value05:30in F3 and01:45in F4. - In cell A5 type; Total hours
- In cell F5 type;
=SUM(F2:F4)
It should now contain the value:10:00
Your filled out table (with formulas instead of values) should now look like this;

Note:
While the Calendar does hold a “Duration” column as well, there is no built-in method in Outlook to export this column to a format which would still allow you to easily make calculations with it in Excel and without losing recurring items.
Tasks and Journal calculations and column formatting
For the Tasks and Journal folder, the calculations are much easier than for the Calendar folder. This is because the Tasks and Journal folder already report the time spent (in minutes) in a separate column.
Doing a calculation on these columns would be a simple =SUM(F2:F4) formula (going by the table above). To get the total time spent converted from minutes to an hours and minutes listing, you must do the following;
- Change the formula to;
=SUM(F2:F4)/1440 - Change the cell formatting to
[hh]:mm

Custom field code for hours:minutes formatting.
Method 3: Using VBOffice Reporter add-in
Using the method described in this guide allows you to manually create separate Excel reports from the Calendar, Tasks and Journal items in Outlook. With the VBOffice Reporter add-in installed, you can directly generate reports from items from multiple and different type of folders and much more.
Templates and export formats
By using templates, you can pre-define reports and (re)generate them with just a few clicks so that you can also quickly produce an up-to-date status report. These reports can be displayed on screen and saved and/or emailed in various formats including Excel, html and csv-format. The company logo, header and further layout can be saved in a template as well so that they are automatically applied when generating the reports.
Fields, filtering and grouping
Fields to be included can be specified when setting up the report as well as applying filters to only display the items that apply to the report. Grouping of the results can be used for instance to create a single report which covers multiple projects.
Calculations
VBOffice Reporter can of course also make calculations based on the time spent on certain activities, report the total amount of items and automatically add up all the mileage that you have recorded with your items.
For more info and screenshots see; VBOffice Reporter
For other reporting tools and add-ins see; Reporting add-ins

An example report of my Test Project grouped by folder. The layout of the report is a default layout supplied with the VBOffice Reporter add-in but can of course be modified.

