 In the Message List, Outlook only shows the Display Name of the person who has sent you the email. A request heard often is to also be able to set Outlook to show the e-mail address of the sender instead of just the name.
While there is no built-in support for this in Outlook, you can display the sender’s e-mail address as a column in the message list by using a custom form configuration file.
- Step 1: Download the custom form configuration file
- Step 2: Copy the custom form configuration file to the correct directory
- Step 3: Install the cfg-file into Outlook
- Step 4: Configure your Message List view
- Step 5: Additional View Settings recommendations (optional)
Step 1: Download the custom form configuration file
 In this guide, I’ll spare you the need to create a custom form configuration file yourself and you can download mine right here;
- Download: viewsenderaddress.zip
If you do not yet know how to apply this configuration file, continue to follow the instructions below.
Step 2: Copy the custom form configuration file to the correct directory
 In theory, you can install the custom form from any directory. However, it is recommended to store it in your user’s Forms directory which by default is located here;
C:\Users\%username%\AppData\Local\Microsoft\FORMS
The files from the zip-file that need to be added to that folder are;
IPML.ICOIPMS.ICOviewsenderaddress.cfg
Step 3: Install the cfg-file into Outlook
 After placing the cfg-file in its correct location, you still need to install it into Outlook. You can do this in the following way;
- Open the Forms Manager dialog;
- File-> Options-> section Advanced-> options group: Developers-> button Custom Forms…-> button Manage Forms…
- In the Forms Manager dialog, press the Install… button.
- Browse to the location where you’ve placed
viewsenderaddress.cfgin the previous section of this guide. - Select the file and press Open.
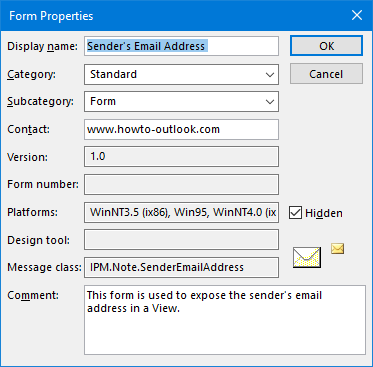
- A property window will open with the details of the cfg-file. Press OK to confirm and close the dialog.
- Press Close to close the Forms Manager dialog.
- Press OK until all open dialogs are close and you are being returned to the main Outlook window.

The form properties of the viewsenderaddress.cfg file.
Step 4: Configure your Message List view
 Now that the custom form configuration file has been installed, you can finally add the address column to your view;
- Open the View Settings dialog;
- Classic Ribbon
tab View-> button View Settings - Simplified Ribbon
tab View-> button Current View-> View Settings… - Press the button called Columns…
- From the dropdown list called “Select available columns from” select; Forms…
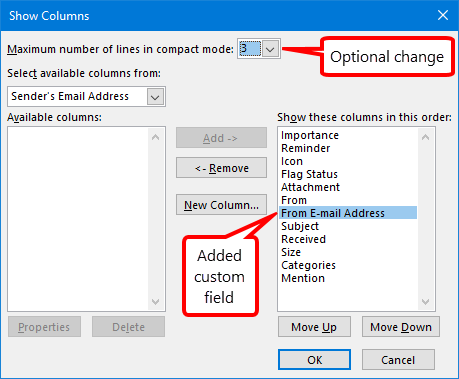
- Here select “Sender’s Email Address” and press “Add ->”
- From the dropdown list called “Select available columns from” select; Sender’s Email Address
- Select “From E-mail Address” and press “Add ->”
- Use the Move Up and Move Down buttons to place it in the location you want.

Adding the From E-mail Address column to your view.

The end result with a 3 line layout.
Note:
If you are connecting to an Exchange server, then you won’t see the email addresses (SMTP) of internal users. Instead you’ll see the Exchange address (X500). You cannot change this.
Step 5: Additional View Settings recommendations (optional)
 Now that you’ve added the column to your view, you might want to consider the following additional view changes;
Change the multi-line layout from 2 to 3
As shown above, a 3 line layout will make the view look better.
You can do this by pressing the Columns button in the Customize Current View dialog and change the “Maximum number of lines in compact mode” option.
Remove the Subject label
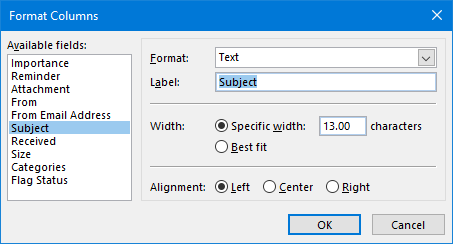
When you’ve changed the layout to 3 lines, sometimes the “Subject” column will show “Subject:” in front of all your message subjects.
You can change this by pressing the Format Columns button in the Customize Current View dialog, select the “Subject” column on the left and modify its label.

Removing the label from the Subject column.
Apply the view to all folders
If you want the column to show in each folder, you can modify the default Messages View to apply the view to all your folders at once.
If not all your folder are in the default Messages View, you can use the “Apply Current View to Other Mail Folders…” command which you can find by pressing the “Change View” command on the View tab.
For more details see; Applying views to all folders


