 Word, Excel and PowerPoint files can be saved directly as pdf-files. Sadly, this option is not available in Outlook, not even in Outlook for Microsoft 365. There are of course alternatives such as a pdf-printer (like “Microsoft Print to PDF” or a 3rd party pdf-printer) , using Adobe Acrobat or a 3rd party add-in such as SaveAsPDF by Sperry Software.
Another way is to use the VBA macro in this guide which uses Word’s capabilities to save documents in the pdf-format.
A benefit of this macro over most pdf-printers is that any hyperlinks within the message will continue to work and any Internet images are automatically downloaded too.
A second macro is provided which allows you to select multiple emails, or even all emails within a folder, and save them as pdf-files all at once.
This guide also contains modification examples to control the default file name for the pdf-file. This is for instance also not possible with a pdf-printer and can be quite a timesaver when you regularly need to save e-mail messages as pdf-files.
ToolTip!![]() SaveAsPDF by Sperry Software is an add-in to quickly archive your emails into pdf-files. The available options go well beyond what the macro in this guide or any pdf-printer can do. For instance, it can save a message together with its attachments into a single pdf-file. It can also monitor specified folders and automatically save messages as pdf-files in the background for archiving purposes.
SaveAsPDF by Sperry Software is an add-in to quickly archive your emails into pdf-files. The available options go well beyond what the macro in this guide or any pdf-printer can do. For instance, it can save a message together with its attachments into a single pdf-file. It can also monitor specified folders and automatically save messages as pdf-files in the background for archiving purposes.
If you decide to order use BH93RF24 to get a discount.
SaveAsPDF and SaveAllAsPDF macros
 The SaveAsPDF macro uses Word’s capabilities to save documents as pdf-file. In short, it saves the selected message (or any other Outlook item) in the mht-format which is then opened in the background in Word where a Save As operation is initiated for the pdf-format.
The SaveAllAsPDF macro works in the same way but allows you to select more than one email to convert to the pdf-format in one go. You’ll be prompted to select the folder to save the messages to.
By assigning a button to the macro, you can save messages as a pdf-file as easy as you would have saved it before.
Quick Install
Use the following instructions to configure the macro in Outlook;
- Download this code-file (
saveaspdf.zip) or copy the code below. - Open the VBA Editor (keyboard shortcut ALT+F11)
- Extract the zip-file and import the
SaveAsPDF.basand/orSaveAllAsPDF.basfile via File-> Import…
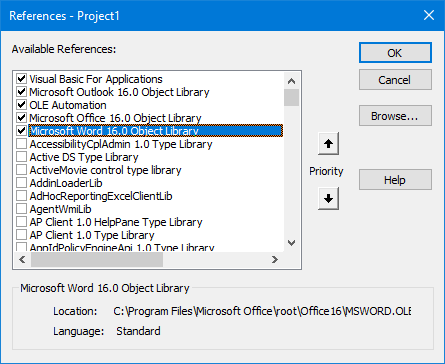
If you copied the code, paste it into a new module. - Add a reference to: Microsoft Word <version> Object Library.
Tools-> References…- Note: The word “<version>” stands for your version number of Word.
- Word 2010 = 14.0
- Word 2013 = 15.0
- Word 2016, 2019 and Microsoft 365 = 16.0
- Note: The word “<version>” stands for your version number of Word.
- Sign your code so you won’t get any security prompts and the macro won’t get disabled.
- Add a button for easy access to the macro.

A button can be added to the main Outlook window or to any of the open item windows.
Note:
It could take some time before the Save As dialog is shown as the macro first needs to load Word in the background. This can take about 3-5 seconds for a modern computer and 5-10 seconds for older/slower computers.
If the message holds external images (such as newsletters), the processing time could increase even more as the images are being downloaded.
Troubleshooting
 Below you’ll find a couple of common issues which you could run into when using this macro and how to resolve them.
Outlook becomes inaccessible and Save As dialog doesn’t show
A common issue is that the Save As dialog doesn’t take the foreground, especially on Windows 7, and as a result Outlook becomes “unresponsive”.
This isn’t an issue with the VBA macro itself but a bug in Windows 7. When this happens, minimizing your Outlook screen by selecting it on the Windows Task Bar (as the Outlook windows itself will be inaccessible) should reveal the Save As dialog. When you have multiple Outlook windows open, hold SHIFT while right clicking on the Outlook icon and choose “Minimize all windows”. Clicking on the Show Desktop icon or pressing the Windows Logo key + M on your keyboard will also minimize everything.
A reasonable effective workaround for this issue is to load the VBA Editor just once during the Outlook session. To do this, press ALT+F11 and then directly close it again. Now when you run the macro, the Save As dialog will pop-up in the front.
Compile error: User-defined type not defined
When you get this error, most likely the line Dim wrdApp As Word.Application is highlighted as well. In that case, you have not enabled “Microsoft Word <version> Object Library” as a reference as indicated (step 4 of the Quick Install guide).

A reference to the Microsoft Word Object Library is required for this macro to work.
Macro appears to do nothing
If the macro used to work and when you are sure the Save As dialog isn’t hidden in the background but the macro suddenly stopped working, it is likely that the WINWORD.EXE process crashed the last time you were working with the macro. To recover;
- Close any open Word document and also verify that the
WINWORD.EXEprocess isn’t listed anymore on the Processes tab of Windows Task Manager (CTRL+SHIFT+ESC). - Open the Temp folder by typing
%TEMP%in the Search box of the Start Menu or in a Run command. - Locate the file
www_howto-outlook_com.mhtright click on it and choose;
Open with-> Microsoft Word. - Read the crash notice and confirm to open it.
- Close Word.
- Run the macro again.
Macro code
The following code is contained in the zip-file referenced in the Quick Install. You can use the code below for review or manual installation.
SaveAsPDF
Click in the area above and press CTR+A to select all. Press CTRL+C to copy the code.
SaveAllAsPDF
Click in the area above and press CTR+A to select all. Press CTRL+C to copy the code.
Modifications
 The suggested file name for saving the pdf-file is created by the macro and is a safe version of the subject of the selected email. This means that any characters within the subject that can’t be part of the filename are removed.
When using the SaveAllAsPDF macro, the file names also contain the received date and time, up to the second, to make sure the file names are unique and emails do not get overwritten.
Depending on your needs, you may want to modify this suggested file name. Below is explained how you can do this and several examples are listed to get your started.
Replace invalid characters with another character
Instead of removing any invalid characters, you may want to replace them with another character which is safe. To do this you must alter the following line;
strFileName = Trim(oRegEx.Replace(strFileName, ""))
If you’d like to replace them with a dash (-) character, you must change it into;
strFileName = Trim(oRegEx.Replace(strFileName, "-"))
If you’d only want replace some characters but drop the others, you can do something like this;
oRegEx.Pattern = "[\/:*<>|]"
strFileName = Trim(oRegEx.Replace(strFileName, "-"))
oRegEx.Pattern = "[?""]"
strFileName = Trim(oRegEx.Replace(strFileName, ""))
Add received date and time
As mentioned, this modification is also included in the SaveAllAsPDF macro and added via these two lines;
DateTimeFormatted = Format(objItem.ReceivedTime, "yyyy-mm-dd_hh-mm-ss")
strFileName = DateTimeFormatted & " - " & objItem.Subject
The date and time format is determined via the y (year), m (month), d (day), h (hour), m (minute) and s (seconds) definition at the end of the first line. You can alter the format and/or separator character if you want but the order above will help sorting the saved items chronologically.
Add sender name or address (?)
Similarly to adding the date and time, you could add the sender’s name or email address to the file name.
strFileName = objItem.SenderName & " - " & objItem.Subject
strFileName = obj.SenderEmailAddress & " - " & objItem.Subject


