 It doesn’t matter if you are sending real Christmas cards or electronic ones, Outlook can be useful to manage either.
This special Christmas guide helps you prepare by using a special Christmas Category, Mail Merge tips and instructions for cards and envelopes and links to templates and pictures you can use in your design.
Christmas Category
 You probably don’t send a Christmas card to all your individual contacts. In that case it is useful to tag the contacts that you want to send a Christmas card with a Category called “X-mas” or something similar.
This will allow you to easily find and group these Contacts together when you want to send your card.
Tip:
When you have multiple members of a single family in your Contacts folder who all live on the same address, you might want to only add one member to the “X-mas” category for a more convenient Mail Merge (for the next section).
Adding the X-mas category
To add an “X-mas” Category, go to your Contacts folder (keyboard shortcut CTRL+3) and perform the following action;
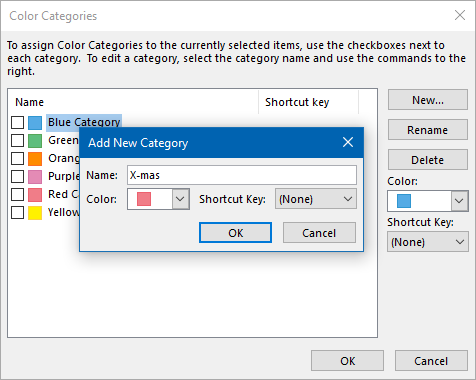
- Select a Contact-> Categorize-> All Categories…-> New…-> type: X-mas-> press OK

Adding the X-mas Category to Outlook.
Once you’ve added the Category, you can select another contact (or even multiple) and add them to the X-mas Category via the list of categories in the same dialog as above or directly via the dropdown list when pressing the Categorize button.
Removing someone (didn’t receive a card back?) can be done in the same way too by un-ticking the box in front of the X-mas category.
Grouping by Category
 Now that all the people that you want to send a card to are added to the X-mas category, you can easily group them together in the following way;
- Select a table style View type;
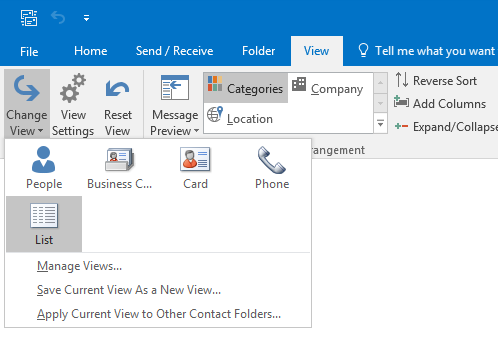
View-> Change View-> choose the “List” or “Phone” view - Set the Arrangement to Categories
- Simplified Ribbon (Microsoft 365 and Outlook 2021)
View-> Arrange By-> Categories - Classic Ribbon
View-> option group: Arrangement-> Categories

Grouping your Contacts by Category in the List View (Classic Ribbon).
Mail Merge
 While many people would say that a Christmas card should be a real card and written personally, the Mail Merge function can still be useful to create labels for the envelopes or even print directly to the envelopes.
- How to do a mail merge is explained in this Mail Merge guide.
- To do a Mail Merge for just the X-Mas Category, you can use the instructions from: Mail Merge filter based on Categories. For Step 1, Method 3 is probably the easiest way to go as we already grouped the contacts by Category.
- For specific instructions to directly print addresses on envelopes see:
Address envelopes with Outlook contact data - For step-by-step instructions to create envelope label stickers see:
Printing Address Label Stickers with Outlook Contact information
As a Greeting Line consider using the word “Family” and the variable “Last Name” so that the label says “Family Doe” instead of “John Doe”.
Tip!
Whether or not you are printing to labels or to the envelopes directly, I would recommend to first try it with normal paper to see if it prints out to your liking.
If not, you can still make adjustments before printing it to (the more expensive) labels or envelopes.
Templates
 Having a nice Christmas design for your card, email or even envelope really rounds things off. There are a lots of templates already on the Microsoft Create website which you can use directly.
Additionally, to lighten up your design even more, you can do an image search on either Google or Bing (my favorite for searching images).
You can even search online for pictures from within Outlook and directly insert them within your message with a single click via;
- Insert-> Pictures-> Online Pictures…
All there is left to say; Merry Christmas and a Happy New Year!


