 When you use Rules to sort your outgoing e-mails into folders you’ll notice that you can actually only “move a copy” to that folder. This rule is quite unclear and actually contradicts itself; does it move or does it copy?
Well it copies and when you use the rule by default, you’ll end up with duplicates which is probably not what you want; you want it to move! This is still achievable but it involves modifying another option and to carefully craft your e-mail rules.
- Step 1: Turn off the generic Save Sent Items option
- Step 2: Create a rule to sort your outgoing mail
- Step 3: Create a rule to save the rest of your mail too
- Step 4: Sort your rules
- Marking moved emails as read
- Add-in alternative: Timed Email Organizer
Step 1: Turn off the generic Save Sent Items option
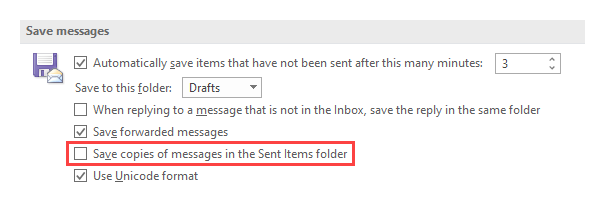
 Since we’re going to sort the outgoing e-mails by using rules, we’re going all the way and actually also manage saving ALL outgoing messages by using rules. This means that we can turn off the generic option “Save copies of messages in Sent Items folder” which is on by default. You can find this option in;
- File-> Options-> section: Mail-> option group: Save messages
Step 2: Create a rule to sort your outgoing mail
 In this example we’ll create a rule to store all messages sent to John Doe in the a folder named “John Doe” which is a subfolder of the Sent Items folder.
- Open the Rules wizard:
- File-> Manage Rules & Alerts
- Press: New Rule…
- From the “Start from a blank rule” section choose: Apply rule on messages I send
- Press Next.
- In the Step 1 section select: sent to people or public group.
In previous versions of Outlook, this condition was called: sent to people or distribution list - In the Step 2 section click “people or public group” and select John Doe from your address book and press Next.
- In the Step 1 section select “move a copy to the specified folder”.
- In the Step 2 section click “specified” and select the John Doe folder.
- In the Step 1 section select “stop processing more rules”.
This is important or you’ll end up with duplicates again! - Press Next and then Next again (unless you want to set exceptions).
- Name the rule. For instance: “Sent Items move: John Doe”.
- Verify that “Turn on this rule” is selected and press Finish.
You can of course create additional rules to move messages to other people to different folders by repeating the above steps but note that each time you must add the action “stop processing more rules” to the rule.
Step 3: Create a rule to save the rest of your mail too
 Currently we’re only saving the mails we’re sorting into other folders. Of course you’ll want to store the rest of your outgoing messages to the Sent Items folder.
We can do this by creating a generic rule; a rule without any conditions.
- Open the Rules wizard:
- File-> Manage Rules & Alerts
- Press: New Rule…
- From the “Start from a blank rule” section choose: Apply rule on messages I send
- Press Next.
- Without selecting anything select Next.
- You’ll get a dialog saying;
“This rule will be applied to every message you send. Is this correct?”
Press Yes.
- In the Step 1 section select “move a copy to the specified folder”
- In the Step 2 section click “specified” and select the Sent Items folder
- Press Next and then Next again (unless you want to set exceptions)
- Name the rule. For instance: Save Sent Items
- Verify that “Turn on this rule” is selected and press Finish.
Step 4: Sort your rules
After creating the rules, you must make sure that the rules are sorted correctly!
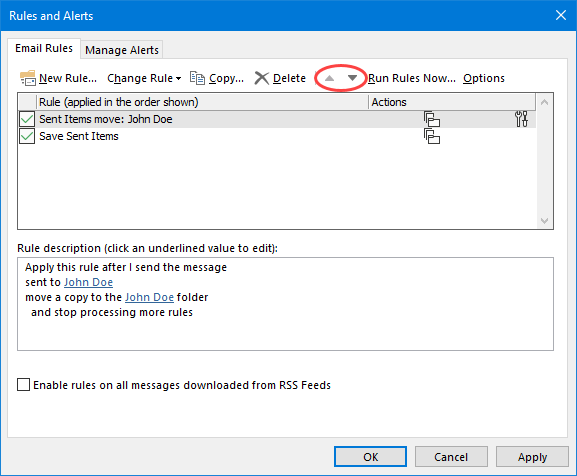
You must set the generic rule to be executed last with above it all the personalized sorting rules. You can do this via the Up and Down arrows in the command list of the Rules and Alerts dialog.

You can use the arrows in the Rules and Alerts dialog to sort your rules.
Marking moved emails as read
 A downside of moving your Sent Items with a rule is that they are being marked as unread. Unfortunately, there is no “Mark as Read” rule action to counter this.
To still be able to quickly mark them as read, you can right click on the folder and choose: Mark All as Read. However, this might not be manageable when you are using a lot of folders to sort your Sent Item into.
A more manageable solution would be to create a Search Folder which includes all your Sent Items folders. You can then simply right click on this folder to mark all messages as read.
The additional benefit of this would be that you also still have a single folder to search in when you want to find back a particular sent item.
- Start with a New Search folder:
- Keyboard shortcut: CTRL+SHIFT+P
- Right click on “Search Folders” in the Folder Pane and choose: New Search Folder…
- Scroll to the bottom of the New Search Folder dialog and choose:
Custom-> Create a custom Search Folder - Press the “Choose…” button.
- Name: Sent Items
- Press the “Browse…” button.
- Deselect the top level mailbox folder and select all the folders to which you move Sent Items to. If those folders are all under the Sent Items folder, then you can just select the Sent Items folder and make sure that the “Search subfolders” option is selected as well. Otherwise, you may also have to disable this option.
- Press OK to close the open dialog.
Note:
When you move your sent emails into folders where you also receive emails, you can press the Criteria… button after step 5 and set the From… criteria with your own email address to filter out the received messages and only show your sent items.
Add-in alternative: Timed Email Organizer
 As you’ve noticed, sorting outgoing emails in Outlook is a bit trickier than it looks at first. Many of the options available are only really targeted at sorting incoming emails rather than outgoing emails.
If you are looking for more flexibility with sorting both your incoming and outgoing emails than the limited set of rules provided, then you can use the “Timed Email Organizer” add-in from Sperry Software (If you decide to order use BH93RF24 to get a discount).
With the Timed Email Organizer add-in, you can easily control how your Sent Items should be organized, this can be based on keywords, (groups of) contacts, or you can be prompted to specify a folder each time you send a message.
You can also combine the above and set priorities to the processing order. For instance, when no keywords and contacts apply, the add-in can prompt you for a folder or just store it into your default Sent Items folder.
This add-in also comes with the option to automatically save sent emails of shared mailboxes in the correct Sent Items folder or into a folder that you specify on a per-account basis.
Moreover, this add-in isn’t restricted to just managing your outgoing emails. It can also augment or fully replace your rules for incoming emails with unique conditions such based on attachment names and performing actions based on how old a message is or generate a report to find out which rules were triggered by a specific message.

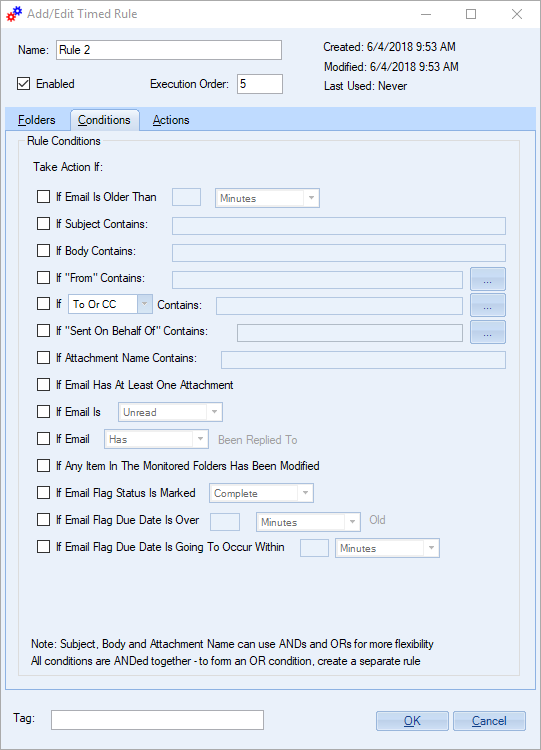
Overview of conditions in the Timed Email Organizer by Sperry Software.


