 Thinking about upgrading your computer to Windows 10 or are you using Outlook on a Windows 10 computer already and are being offered a major Windows 10 update?
What should you be aware of when you heavily rely on Outlook?
The upgrade process from Windows 7 and Windows 8 is actually quite streamlined and trouble free for most configurations. Things are even easier when applying a major update to Windows 10. However, for either upgrade, there are still a couple of attention points before you start.
This guide contains not only upgrade preparation and troubleshooting steps but also various tips about the changes that you could encounter involving Outlook after upgrading to Windows 10.
- Is your Outlook version compatible with Windows 10?
- Upgrading from Windows 7 or Windows 8
- Updating Windows 10 to the latest version of Windows 10
- Microsoft 365 Activation not valid
- Add-in Compatibility
- Virus scanner integration
- Send/Receive error: 0x800CCC13
- PST File access is denied
- iCloud doesn’t work
- No New Email notifications
- Rebuild search index / no search results
- Pictures not showing and “Work file” error
- Scan for and fix more issues with SaRA
- Clean install or upgrade has failed
- Other changes concerning Outlook and Windows 10
Is your Outlook version compatible with Windows 10?
 Officially, only Outlook 2013, Outlook 2016, Office 2019, Office 2021 (+LTSC) and Microsoft 365 are supported to run on Windows 10.
However, before even starting Outlook 2013 on Windows 10, make sure you first apply at least Service Pack 1 for Office 2013 and any additional updates. This takes care of some known compatibility issues. Also, be aware that Outlook 2013 is only still supported until April 11, 2023.
Of course it is always wise to stay current with the latest update releases, so make sure you set Windows Update to also include updates for other Microsoft applications. Microsoft 365 installations (including Office 2016 Retail, Office 2019 and Office 2021) will automatically keep themselves up-to-date but you can always check for updates manually.
Continuing to use Outlook 2010, Outlook 2007, or even earlier versions, really isn’t recommended (on any version of Windows that is) as these versions are out of extended support. These versions of Office are vulnerable for various security issues for which updates haven’t been made available anymore.
Upgrading from Windows 7 or Windows 8
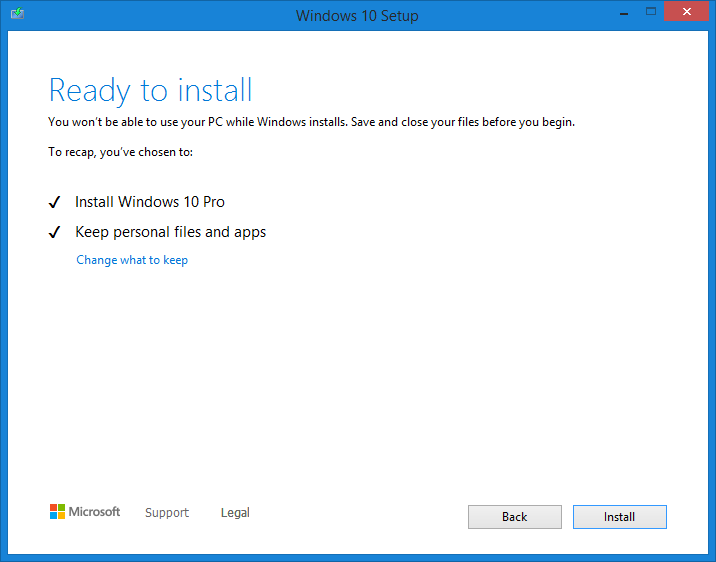
When you are upgrading from Windows 7 or Windows 8.1, then you can do an actual in-place upgrade as long as you are upgrading to the same Windows Edition (Home, Professional or Enterprise). If you were using Windows 7 Ultimate, then you can upgrade to Windows 10 Professional. Windows 7 Start users can upgrade to Windows 10 Home.

When you are upgrading to the same Windows Edition, everything will migrated.
Programs, files and settings will then be migrated automatically to Windows 10 and after upgrading you can directly logon to Windows 10 and start Outlook with all its files and settings in place; just like you left it in Windows 7 or Windows 8.
Nevertheless, it is still good practice to make a proper backup (not just of Outlook, but preferably your entire computer) and write down your account settings before starting the upgrade process. In these cases it really is better to be safe than sorry.
When doing an in-place upgrade, it will automatically run the Windows 10 Upgrade Assistant. This tool will indicate which drivers and applications you need to uninstall or update before or after the installation process. This will increase the speed of the upgrade, its chance of success and decrease the chance of ending up with broken applications or other troubleshooting requirements.
A common application that you’ll need to uninstall on Windows 7 is Microsoft Security Essentials. There is no need to install this afterwards as Windows 10 has the features of Microsoft Security Essentials built-in in the form of Windows Security (which replaced Windows Defender).
Note:
If you did not format your PC before upgrading but did choose to do a clean install, you may also be able to find back your original Outlook data under:
- Outlook 2007 and previous
C:\Windows.old\Users\%username%\AppData\Local\Microsoft\Outlook\ - Outlook 2010, Outlook 2013, Outlook 2016 and Microsoft 365
C:\Windows.old\Users\%username%\Documents\Outlook files\
Updating Windows 10 to the latest version of Windows 10
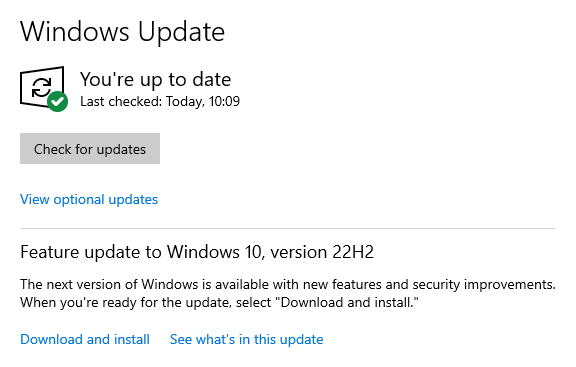
 When you already have Windows 10, then the latest version of Windows 10 is always being offered via Windows Update.
However, when a major update for Windows 10 has just been released, it may not yet be offered to you via Windows Update as Microsoft doesn’t distribute the update to everyone at once.
Doing a manual search for updates will usually give you the option to install it unless there is a blocker specific for your configuration (like when incompatible hardware is detected).
When your computer is also capable of running Windows 11 and you are offered to do so, but are not ready to upgrade to Windows 11 yet, you may not be offered to update to the latest version of Windows 10 either. In that case, click on the “Stay on Windows 10 for now” link in the Windows 11 banner and check for updates again. This should then provide you with the option to install the latest Windows 10 Feature Update.
If you are not yet being offered the latest version of Windows 10 via Windows Update but you already want to update anyway, then you can always initiate the update via the Windows 10 Update Assistant.
Microsoft 365 Activation not valid
 When you have a Microsoft 365 license and start Outlook or any other of the Office applications for the first time after the upgrade, you may be prompted to log on with your Microsoft Account again to re-activate your installation or receive a warning that your license is no longer valid.
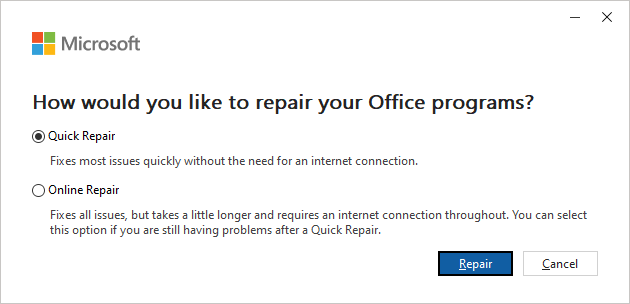
In case of the last, the solution to this annoying issue is luckily easy and fixed within minutes; Run a Quick Repair on your Office installation.
To do this, make sure all your Office applications are closed, and choose;
Start-> Settings-> Apps-> select your Microsoft 365 or Office application-> button Modify-> option Quick Repair.

When encountering Office issues after upgrading to Windows 10, a Quick Repair might solve it.
Add-in Compatibility
 If you are using any add-ins with Outlook, make sure they are also compatible with Windows 10. You’ll probably find that most of them are compatible as Windows 10 is in that aspect similar to Windows 7 and Windows 8 and most of the compatibility requirements for add-ins are coming from Outlook and not from Windows.
Still, since add-ins are not limited to operate just within Outlook and with Outlook data, it is a good thing to check with the vendor of the add-in first.
If you are having startup issues with Outlook after upgrading, disabling your add-ins would be a good first troubleshooting step.
Virus scanner integration
 Even though Windows 10 has its own virus scanner in the form of Windows Security, you might opt to install a 3rd party virus scanner instead. When installing your virus scanner, make sure you do not install any Outlook integration components. This is not specific to Windows 10 or any Outlook version but a general best practice for Outlook.
There are many known issues caused by having a virus scanner integrated with Outlook. These issues range from poor Outlook performance to send receive errors and from corrupted emails to complete data loss.
You can safely disable this integration part of your virus scanner without compromising your security; you’d still be sufficiently protected by your on-access scanner part of the virus
scanner.
Send/Receive error: 0x800CCC13
 When you try to send a message, you could receive the following error:
Error message: ‘Robert – Sending’ reported error (0x800CCC13): ‘Cannot connect to the network. Verify your network connection or modem’
While the exact cause for this issue is unknown, to fix it you must run “sfc /scannow” from an elevated Command Prompt and reboot your computer afterwards;
- Right click on the Start button of Windows and choose: Windows PowerShell (Admin).
- If you don’t see this, instead choose: Command Prompt (Admin)
- Behind the prompt type:
sfc /scannow
(note the space in the command) - Wait until the process completes. This usually doesn’t take longer than 20 minutes with a regular hard disk and takes much shorter when you have a fast SSD drive.
- Restart your computer.
PST File access is denied
 Upon starting Outlook, you may receive the following error message:
Cannot start Microsoft Outlook. Cannot open the Outlook window. The set of folders cannot be opened. File access is denied. You do not have the permission required to access the file
C:\Users\Robert\Documents\Outlook Files\Robert.pst.
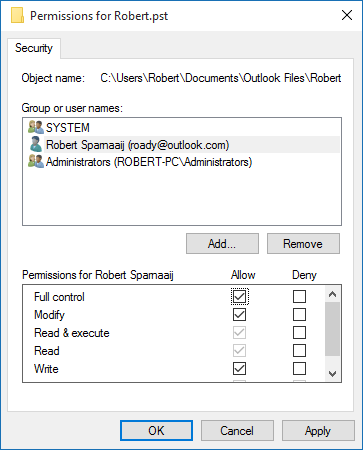
In that case, you’ll need to adjust the file permissions for the pst-file that is referenced and grant yourself “Full Control” permissions.
- Browse to the file location as indicated in the error.
- Right click on the file and choose Properties.
- Select the Security tab.
- Press the Edit… button.
- Select your user account.
- Select the “Full control” permission.
- Press OK until all dialogs are closed.
- Start Outlook again.

Give yourself Full Control to your pst-file.
Tip!
When you are suffering from this issue, it may be wise to reset the permissions for your entire user folder. For detailed steps how to do that see: PST File access is denied after upgrading to Windows 10
iCloud doesn’t work
 Do you have the iCloud add-in installed? It may not work anymore after upgrading to Windows 10. To solve this, remove iCloud from your mail profile, repair the iCloud installation and then re-add the iCloud configuration to Outlook again via iCloud Control Panel.
- File-> Account Settings-> Account Settings…-> tab Data Files
- Select the iCloud data file and press Remove.
- If you also connected to the iCloud account via IMAP, remove this account.
- Make sure you export all the content that is stored in folders that are marked with “This computer only”.
- Close Outlook.
- Open the iCloud Control Panel via the Start Menu and uncheck the option: Mail, Contacts, Calendars, and Task with Outlook.
- Download and install the latest version of iCloud via the Apple website or directly from the Microsoft Store.
- When you already have the latest version installed, choose the Repair option.
- Reboot when being prompted to do so by the iCloud installer.
- Open the iCloud Control Panel via the Start Menu and select the option: Mail, Contacts, Calendars, and Task with Outlook.
- If this is a new installation of iCloud, iCloud may prompt you to run a repair on the iCloud installation again and reboot. Outlook integration will be available then.
- Start Outlook and let iCloud resync your data.
No new email notifications
 If you no longer get any New Email Notifications, then click on the Action Center icon in the bottom right corner of your Taskbar to see your past notifications including emails from Outlook 2013, Outlook 2016, Outlook 2019, Outlook 2021 and Outlook as part of a Microsoft 365 subscription.
To get the New Email Notification banner again for each email that you receive;
- In the Action Center, in the top right click on: Manage notifications.
- An alternative method is;
Start-> Settings-> System-> from the Navigation Panel on the left choose: Notifications & actions.
- An alternative method is;
- In the “Get notifications from these senders” section at the bottom, click on Outlook.
- Make sure that you have enabled all notification options which you want to get (“Hide content when notification are on lock screen” is off by default) and select how many notifications should be visible in the Action Center.
- Close Settings.

Default Notification Settings for Outlook on Windows 10.
Note:
Outlook will only show New Email Alerts when the message is delivered to the Inbox folder. To make it show an alert even when the message is automatically moved to another folder by a Message Rule see the guide Creating a permanent New Mail Desktop Alert.
Rebuild search index / no search results
 After the upgrade to Windows 10 has finished, you might notice that no search results are being returned when you use the Search field in Outlook.
The first solution to this is: Wait!
In most cases, Windows Search still needs to re-index your Outlook content (and the rest of your computer) and will fix itself eventually when the computer is idle.
If results are still not being returned after you’ve left your computer idle for an extended period of time (like for instance overnight), then you can use the following troubleshooting guide: Fixing Instant Search.
Pictures not showing and “Work file” error
 After upgrading, you might encounter an issue where pictures from the Internet might not be downloading into the message or that you get an error which reads;
Outlook could not create the work file. Check the TEMP environment variable.
Solving this issue is 2-fold and requires editing the Registry;
- Reset the registry value for the location of the “Temporary Internet Files” folder to default.
- Delete the registry entry for the “SecureTempFolder” in Outlook
Step 1
The Registry entry for the Temporary Internet Files folder can be found here;
- Value name:
HKEY_CURRENT_USER\Software\Microsoft\Windows\Current Version\Explorer\User Shell Folders - Key name:
Cache - Value type:
REG_EXPAND_SZ
Here, verify that the location for that key is set to;%USERPROFILE%\AppData\Local\Microsoft\Windows\INetCache
Step 2
Outlook uses a subfolder in the Temporary Internet Files folder to write its temp files which are retrieved from the Internet. For instance; linked pictures and attachments. To make sure a proper folder is being created, we reset the reference to this folder so that Outlook will recreate the registry entry and folder automatically the next time is needs to be used.
- Value name:
HKEY_CURRENT_USER\Software\Microsoft\Office\<version>\Outlook\Security - Key name:
OutlookSecureTempFolder - Value type:
REG_SZ
Delete the key name. If the key name is not there, you’re ok already.
Now restart your computer for the changes to take effect and try again.
For more information about the SecureTempFolder for Outlook see the guide:
Error opening attachments / Cleaning out the Temporary Outlook Files folder.
Scan for and fix more issues with SaRA
 If you are still having issues now, or even if you haven’t, use the “Microsoft Support and Recovery Assistant” (SaRA) to scan for a specific issue or your entire Outlook configuration for any known issues that can cause problems.
After the scan completes, SaRA offers you to fix the issue if it was successful detecting the cause of the issue.
Via Advanced Diagnostics, SaRA can do a full scan of your Outlook configuration and will create a detailed report of all Outlook issues it detected. For any problems that are listed in the report, you are provided with a link to an article about that specific problem so that you can read about possible fixes.
SaRA may also find some issues that you didn’t know about yet and/or already had before upgrading to Windows 10.
Download: Microsoft Support and Recovery Assistant (SaRA)
Clean install or upgrade has failed
 Did the upgrade fail and/or do you want to do a clean install of Windows 10 on a new or formatted disk?
During the setup process, when being prompted for what to keep, choose for the “Nothing” option. Of course, this means that you need to have a backup of all data that you wish to keep and restore that afterwards.
You can also download the Download Windows 10 to create a bootable USB-based installation media or burn to a DVD and boot your computer with.
For more information see the section: Create Windows 10 installation media.
Other changes concerning Outlook and Windows 10
 If you were previously using Windows 7 or Windows 8, using Outlook on Windows 10 is pretty much the same. If you were previously using Windows XP or Windows Vista, you’ll also find some functionality changes within Windows 10 that will affect Outlook.
Below you’ll find some links discussing these changes.
- Organizing and managing Outlook windows
- Starting Outlook as an Administrator on Windows 10
- Starting Outlook in Safe Mode
- Enabling automatic updates for Office
- Add frequently used Templates to Outlook’s Jump List
- Creating an Outlook Desktop shortcut in Windows 10
- Searching for Outlook items from the Start Menu, Start Screen or Explorer Search
- Live Tiles for Outlook on Windows 8


