
 When you look at the printing options in Outlook, you’ll find that there is no Calendar Style a yearly calendar. Microsoft has published several yearly calendar templates for Word, Excel and PowerPoint but these are all static and thus do not contain any key dates that you have stored in Outlook such as Holidays, Birthdays and Anniversaries.
Outlook itself can only print up to monthly calendars and while you could print multiple months on a single sheet of paper, they are still not very attractive to look at for an entire year.
A solution would be to use the Calendar Printing Assistant which is a free program from Microsoft which supports Outlook 2007 and Outlook 2010. It contains various, visually appealing, Yearly Calendar templates which can be customized and include information that you’ve stored in Outlook.
This guide provides instructions on how to print a yearly calendar with key dates such as Holidays and Birthdays and also contains exclusive templates to further improve the printing output.
- Creating a Calendar with Holidays and Birthdays
- Creating a yearly calendar in Calendar Printing Assistant
- Optional: Formatting the yearly calendar
- Modified template without end-date, Location and Category
- Alternative methods to filter out your Holidays and Birthdays
Creating a Calendar with Holidays and Birthdays
As the Calendar Printing Assistant (CPA) cannot filter your calendar, you’ll have to copy the holidays, birthdays and/or anniversaries (and any other occasion which you want to include on the calendar) to a separate calendar in Outlook first.
By using the Instant Search feature, this goes a lot quicker than it sounds;
- Add the holidays for your country to Outlook;
- Outlook 2007
Tools-> Options…-> button Calendar Options…-> button Add Holidays… - Outlook 2010
File-> section Options-> section Calendar-> group Calendar Options-> button Add Holidays…
- Outlook 2007
Type the following in the Instant Search field within your Calendar;
holiday OR birthday OR anniversary
The Instant Search field can be found on the right side above the calendar.Note:
The above query should be quite accurate into filtering out only the needed items. Don’t worry about whether or not they actually take place this year.
For alternative methods, see the section at the end of this guide.- Select all the returned items by using CTRL+A
- Initiate the “Copy to Folder…” command (keyboard shortcut; CTRL+SHIFT+Y).
Copy it to a newly created Calendar folder called “Holidays”.
")
Copy selected items to a new Holidays calendar (CTRL+SHIFT+Y)
Creating a yearly calendar in Calendar Printing Assistant
Now that you have added all the dates which you want to include on your yearly calendar to a separate calendar, it’s ready for printing with CPA.
- Download and install the Calendar Printing Assistant from the Microsoft website if you haven’t done so already.
- Start CPA via the Start Menu; it cannot be started from within Outlook!
Start-> All Programs-> Microsoft Office-> Microsoft Office Tools - In the “Calendars and Tasks” pane on the left, disable the selected Calendar and Tasks folders.
- Choose Insert-> Calendar and Tasks…
- Select the newly created Holidays calendar in the pane on the right.
- Click on the “Select a template for this view from the template gallery” link in the middle of your screen.
- Select a Week, Month or Year template for your calendar.
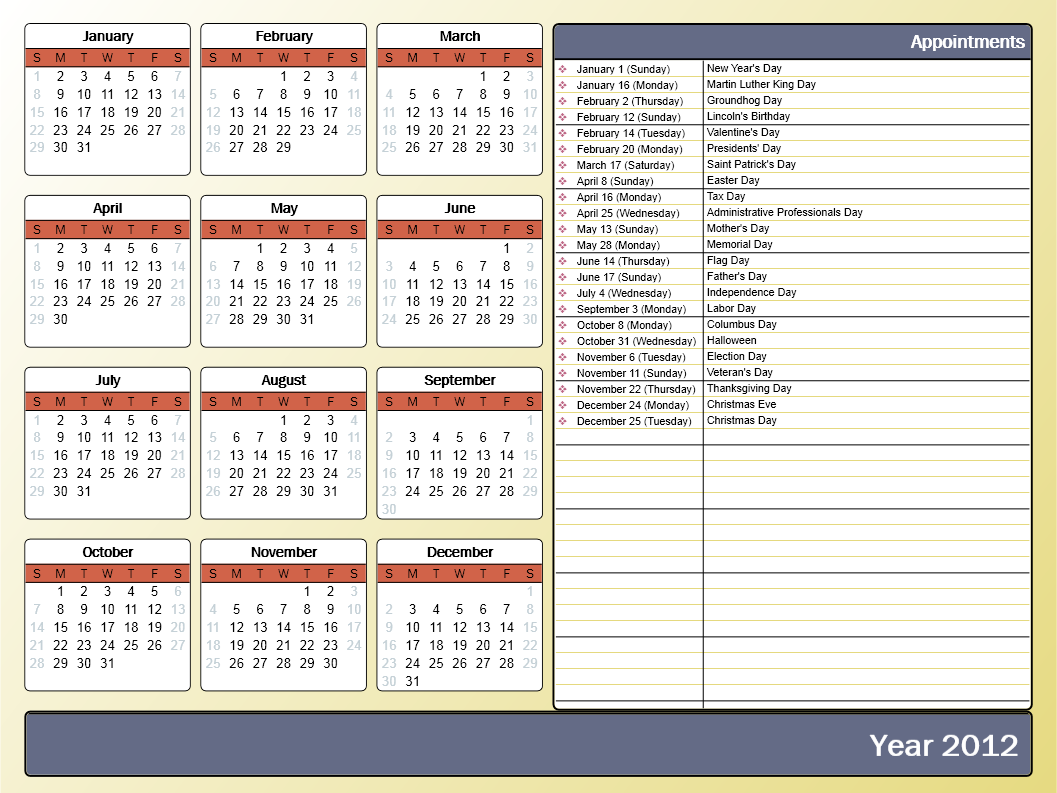
In this example we’ll use the “Year with Key Dates” template which can be found by expanding the “Year Templates” group.
")
After following the above steps, your CPA screen should now look like this.
(click on image to enlarge)
Optional: Formatting the yearly calendar
There are a couple of ways to make your yearly calendar truly your own by changing the colors, fonts and calendar style. You can find these options under Format menu. Personally, I prefer to customize them in the reverse order; first I change the calendar style, then the fonts and then the colors, but is of course all up to you.

Most of the visual changes can be set via the Format menu.

Calendar symbol
To change or remove the symbol in front of the dates in the Appointments column, you must right click on the “Holidays” calendar in the “Calendars and Tasks” Pane on the left and choose; Change Symbol…
To remove it choose the empty calendar character by scrolling all the way up in the symbols list.
Separate symbols for Holidays, Birthdays and Anniversaries
If you want separate symbols for Holidays, Birthdays and Anniversaries, you’ll have to create separate calendars for each in Outlook first.
Remove “Holiday” text
If you see “Holiday” behind all your Holidays and want to remove this, you’ll have to back to Outlook and remove the “Holiday” category from all your Holiday entries in the “Holidays” calendar. (how often can you put “Holiday” in a single sentence? ![]() )
)
An easy way to do this;
- Do a search for “Holiday” in the newly created “Holiday” calendar
- Select all results via CTRL+A
- Right click on the selection and choose;
Categorize-> Clear All Categories
The changes should be directly visible in CPA.
Tip:
The modified template in the section below also removes the Category from the calendar without the need to make any changes in Outlook.
Modified template without end-date, Location and Category
Aside from displaying the category, 3 other things which bugged me were;
- it showed the date in short format including the year
- it showed the end-dates for each full day event
- it showed the location (which is the country for Holidays)
There is no option in the Calendar Printing Assistant to disable this. Assuming that I’m not the only one who did not want to display this, I’ve created 2 custom Calendar Printing Assistant templates based of the original template but fixes the above mentioned annoyances;
Year_YearWithKeyDates02.catx
Shows the date as; 1 January (Sunday)Year_YearWithKeyDates03.catx
Shows the date as; January 1 (Sunday)
Download: cpa-yearwithkeydates-custom.zip
To use these templates;
- Extract the downloaded zip-file.
- Copy the templates to the following folder (requires Administrator permissions);
- Windows 32-bit
C:\Program Files\Microsoft Office\Templates - Windows 64-bit
C:\Program Files (x86)\Microsoft Office\Templates
- Windows 32-bit
- In CPA, you’ll find the templates in the “Year Templates” section.
Modified template 3, with color style “Civic”, font set “Franklin Gothic Book with Arial”,
calendar style “Rounded” and a custom calendar icon. (click on image to enlarge)
Alternative methods to filter out your Holidays and Birthdays
Instead of doing a search, you can use the following methods to filter and copy the items your want to the “Holidays” calendar.
Finding Holidays via the By Category view
- Place your Calendar in a List view;
- Outlook 2007
View-> Current View-> All Appointments - Outlook 2010
View-> Change View-> List
- Outlook 2007
- Sort your view By Category.
- Select the Holidays category and press CTRL+SHIFT+Y (copy selected items)
- Copy it to your “Holidays” calendar folder.
Confirm the dialog which tells you that the action applies to all items.
Finding Birthdays and Anniversaries via a Filtered view
- Place your Calendar is a List view as instructed above.
- Open the View Settings dialog;
- Outlook 2007
View-> Current View-> Customize Current View… - Outlook 2010
View-> View Settings
- Outlook 2007
- Press the Filter… button.
- On the “Appointments and Meeting” specify the following in the “Search for the word(s):” field;
birthday; anniversary - Select the Advanced tab and enter the following criteria;
- Field: Recurrence
- Condition: equals
- Value: Yearly
- Press; Add to List
- Press OK and OK again to apply the filter and to return to Outlook.
- Select the filtered list and press CTRL+SHIFT+Y (copy selected items).
- Copy it to your “Holidays” calendar folder.

