
 If you don’t like the way Outlook looks like by default, you might want to find out how you can change the fonts types, sizes and colors in Outlook to suit your taste better.
Most of them can be changed but the way to do it is scattered between various Windows and Outlook settings and even then they are not in a single location. Some sections can even be modified in multiple ways to reach the same or similar results.
This guide provides an overview how you can change which section of Outlook and if it needs to be done at Outlook level or at Windows level.
Tip!
Are you looking for a method to give Outlook 2013, 2016 or 2019 a more “classic” look? Then see: Making the Outlook 2013 interface less white and bright.
- Settings at Windows level
- Settings at Outlook level
- Main interface theme
- Touch Mode
- Mail item list
- Reading Pane
- Navigation Pane
- Calendar font type and size
- Calendar background color
- Calendar items background color
- Date Navigator/Side Calendar
- Notes fonts and background color
- To-Do Bar
- Tasks folders and To-Do list
- Writing emails
- Preface comments with
- Background color for emails
- Search highlighting
- Fonts used when printing
Settings at Windows level
 We begin with the settings at Windows since chances are that if you don’t like the general font and color settings in Outlook, you probably don’t like them in other applications either. By modifying the settings at Windows level, you change all the settings for all the applications (that respect the Windows settings) at once so you don’t have to change it for each individual application.
Text size and the general interface
 Modifying the size of the general interface, and thus also the font, is quite popular these days with monitors capable of very high resolutions. The higher your resolution settings, the smaller your letters will become. The solution is not to decrease your resolution settings as that will leave you with a less sharper image. Especially TFT/LCD-screens are designed to be ran in their highest resolution. The solution is to change the DPI or Zoom settings in Windows.
Windows 10
- Right click on an empty spot on your Desktop and choose “Display Settings”.
- In the “Scale and layout section”, use the “Change the size of text, apps, and other items” dropdown list to set your preferred zoom level.
- To set a custom zoom level, press the Custom scaling link (Windows 10 Version 1709) or the “Advanced scaling settings” link (Windows 10 Version 1803). Since Version 1803, Windows can also detect desktop apps which don’t zoom and improve their graphics output via the option: Let Windows try to fix apps so they’re not blurry.

Windows 8 and Windows 8.1
- Right click on an empty spot on your Desktop and choose “Screen Resolution”.
- Click “Make text and other items larger or smaller”.
- You can now directly choose to make the fonts larger.
- If you prefer a specific font size, you can click on the “Custom sizing options” text link below the presets and type any percentage you like.
- When you have multiple monitors connected and are using Windows 8.1, then you can select the option “Let me choose one scaling level for all my displays” to set custom DPI settings.

Windows 7
- Right click on an empty spot on your Desktop and choose “Screen Resolution”.
- Click “Make text and other items larger or smaller”.
- You can now directly choose to make the fonts larger. If you prefer a different font size, you can click on the “Set Custom text size (DPI)” on the left and type any percentage you like.

Themes in Windows
 Outlook comes with its own themes independent from Windows, but more about that later.
The general Windows Theme settings only limitedly affect the appearance of Outlook 2007 and Outlook 2010. Outlook 2013, Outlook 2016, Outlook 2019 and Office 365 are even less affected by the Windows Theme settings.
Font type and colors
 The size and color of a few Outlook sections and elements can be adjusted via Windows settings. These sections and elements are mainly controlled via the font settings for “Menu item” and “Window item”. Obviously, this will also affect other applications.
Windows 10
Windows 10 no longer lets you modify individual font settings throughout Windows. Instead, it is recommended to adjust your scaling level in Windows via Display Settings.
Windows 8 and Windows 8.1
- Right click on an empty spot on your Desktop and choose “Screen Resolution”.
- Click “Make text and other items larger or smaller”.
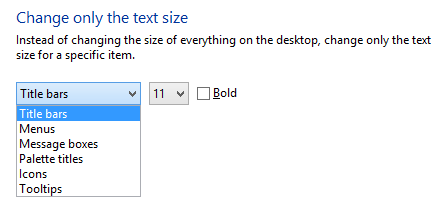
- In the bottom section, you can control the font size of various elements such as Title bars, Menus, Message boxes, etc…. Changing the font size and color is not possible.
Windows 7
- Right click on an empty spot on your Desktop and choose Personalize…
- Click Window Color.
- If you are running the Aero interface, then you additionally need to click “Advanced appearance settings”.

Clicking on the elements in the Window Color and Appearance dialog
automatically selects the corresponding item in the dropdown list.
Menu item
You’ll find that most of the fonts sizes will change when you make changes to the “Menu” item setting. A change of color will not affect Outlook but could affect other applications.
Window item
You can also change the “Window” color settings to get rid of a lot of the white in Outlook’s interface. Note that although the background color of your message changes too, the receiver won’t see this color unless you specifically set it when composing.
Note:
The font type of the Navigation Pane cannot be changed in Outlook 2007.
Changing the font color of the Navigation pane cannot be changed in Outlook 2010 via the Menu appearance item but can be set to white when you set your Office theme to Black.
Borders
When using the classic interface on Windows 7, you can also modify the border colors here and even make them smaller by modifying the “Border Padding” size. Note that the Classic Themes are no longer available in Windows 8 and Windows 10.
Settings at Outlook level
 If the font size throughout Outlook is an issue for you, then it is recommended to change this at Windows level since it is the same for all other applications.
However, there are also a lot of options within Outlook to make even more changes. Most of them are devoted to only a certain section within Outlook.
Main Interface Theme
 Outlook/Office comes with various skinning themes of its own;
- Outlook/Office 2007 and 2010
Blue, Silver and Black - Outlook/Office 2013
White, Light Gray and Dark Gray - Outlook/Office 2016, 2019 and 365
Colorful, Dark Gray, Black, and White
To change your Office theme;
- Outlook 2007
Start a new message-> press the Office logo at the left top-> Editor Options-> section: Popular-> Color scheme - Outlook 2010
File-> Options-> section: General-> Color scheme - Outlook 2013 / 2016 / 2019 / Office 365
File-> Office Account-> Office Theme
Touch Mode
 Touch Mode is a feature in Outlook 2013, 2016, 2019 and Office 365 which controls the size and spacing of various elements within the Office and Outlook interface. This is mainly intended for use with a touch screen but can be of help in other cases as well.
If you have are using a Touch Screen, then usually this options is already available to you in the Quick Access Toolbar (QAT). If you are not using a Touch Screen or if the option isn’t listed even though you are, you can make it available to you by clicking on the down arrow in the QAT and choose-> Touch/Mouse Mode
When you click on the button, you get the option to switch between Touch and Mouse Mode. This is just an interface optimization; you can control Outlook 2013, 2016, 2019 and Office 365 via touch or a mouse in either mode.

Optimize Outlook for use with fingers by enabling Touch Mode.
Mail Item list
 The mail items list is the main overview of all your mails in a folder. You can change the font type, size and color via the View settings in Outlook. These can be different for each folder or the same for all or just some of them. You can also set conditions to make some items stand out by using a larger font or by using a different color. To modify use;
- Outlook 2007
View-> Arrange By-> Custom…-> button Automatic Formatting… - Outlook 2010 / 2013 / 2016 / 2019 / Office 365
tab View-> button View Settings-> button Conditional Formatting…
If you used the above method to change the text color of the Navigation Pane, then you can make the mail items list black again via Automatic/Conditional Formatting settings.
For more information about Automatic/Conditional Formatting see the guide; Color Code your Emails, Calendar, Contacts or Tasks automatically with Conditional Formatting.

Setting your Automatic Formatting color to Black instead of Auto
makes it stop using your default Windows font color.
Reading Pane
 The font settings in the Reading Pane can be changed in various ways but which method is best depend on a lot of things.
- Changing the DPI settings in Windows is the best approach when the font in general is too small to read.
- If you only have issues with the font size on certain occasions (when people are sending their mail in a font that is too small), then zooming those specific messages would be the way to go. This can also be automated via the Zoom Email Windows add-in from Sperry Software (discount code BH93RF24 ).
- If you don’t like it that the display of the emails is at the mercy of the sender, then you can opt to have all your emails delivered in Plain Text instead and specify your favorite font, size and color to read and compose your messages in.
A description on how to use all these techniques can be found in the guide: Enlarge font in Reading Pane.
Folder Pane / Navigation Pane
 As mentioned previously, in Outlook 2007, Outlook 2013 and Outlook 2016, the Navigation Pane can only be modified via Windows settings on Windows 7 or via Display Settings in any Windows version.
Only Outlook 2010 has an option to directly modify the Navigation Pane font type and size:
- tab View-> button Navigation Pane-> Options…-> button Font

Changing the font of the Navigation Pane from within Outlook 2010.
Note:
The font color of the Navigation pane cannot be changed directly in Outlook 2010 but can be set to white when you set your Office theme to Black.
Calendar font type and size
 To change the font type that is used in your Calendar, you can use the “Other Settings” dialog in your View settings.
- Outlook 2007
View-> Current View-> Customize Current View-> Other Settings… - Outlook 2010 / 2013 / 2016 / 2019 / Office 365
tab View-> View Settings-> button: Other Settings…
Here you can set different fonts for the Time (Outlook 2007 and Outlook 2010 only), general text and your Monthly calendar. Additionally you can set if certain items should show in bold or not (Outlook 2007 and Outlook 2010 only).

Other Settings dialog box for the Calendar of Outlook 2013 and Outlook 2016.
Calendar background color
To change the background color of the Calendar use;
- Outlook 2007
Tools-> Options… -> button: Calendar Options… - Outlook 2010 / 2013 / 2016 / 2019 / Office 365
tab View-> button Color
Changing the background color of the calendar can also help to have the “Today” mark stand out a bit more for you.
Calendar items background color
The background color of an item in the calendar is determined by the color of the last category that got assigned to the item.
In case no Category or Label is assigned in the above mentioned versions of Outlook, you can use Conditional Formatting or Automatic Formatting.
Date Navigator/Side Calendar
There are a couple of places where Outlook shows a small calendar which is officially called the Date Navigator;
- To-Do Bar
- When hovering over the Calendar icon at the bottom of the Navigation Pane in Outlook 2013, 2016, 2019 and Office 365 when Compact Navigation is enabled.
- When hovering over the word Calendar at the bottom of your screen in Outlook 2013, 2016, 2019 and Office 365 when Compact Navigation is disabled.
- Calendar Navigation Pane (CTRL+2).
You can control the font settings (but not the color) for this small calendar by going to;
- Outlook 2013 / 2016 / 2019 / Office 365
There is no option to change the Date Navigator display in Outlook. It’s size is controlled by Windows DPI settings. - Outlook 2010
File-> Options-> section: Calendar-> option group: Display options-> button Font… - Outlook 2007
Tools-> Options…-> tab Other-> button Advanced Options…-> button Font… next to the option Date Navigator
Note:
Setting this font also increases the font of the week numbers if you have the “Show week numbers” option enabled.
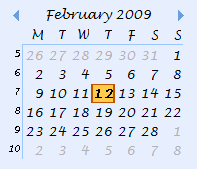
Custom styled Date Navigator in Outlook 2007.
Notes fonts and background color
 If you are using Notes, you’ve probably found out already that you can change the color of them. You can set the default background color and font settings via;
- Outlook 2013 / 2016 / 2019 / Office 365
You can’t set a default color but you can control the color of an individual item by assigning a Category to a Note. - Outlook 2010
File-> Options-> section: Notes and Journal - Outlook 2007
Tools-> Options-> Notes Options…
To-Do Bar
 The To-Do Bar in Outlook 2007 and Outlook 2010 actually consists out of 3 components and in Outlook 2013 and Outlook 2016 out of 4. Each is controlled separately by a separate method.
- Date Navigator
Via the Date Navigator settings discussed previously here. - Appointments
The background color matches the Category color that is assigned to the item.
The font cannot be changed although the font color will change to white when the selected main category is one of the darker colors. - People (Outlook 2013 / 2016 / 2019 / Office 365)
No specific font settings apply other than the default Windows DPI settings. - Task List
The Task List can be controlled by modifying the Automatic/Conditional Formatting settings as discussed previously. To bring up that screen for the Task List, right click on the “Arranged By” header of the Task List and choose Custom…
Tasks folders and To-Do List
 The main color for overdue and completed tasks can be set via:
- Outlook 2007
Tools-> Options…-> button: Task Options… - Outlook 2010 / 2013 / 2016 / 2019 / Office 365
File-> Options-> section Tasks
Additional font settings can be set via Automatic/Conditional Formatting.
Note:
The Tasks folder and the To-Do List can have different settings. In short, the difference between the Tasks folder and the To-Do List is that the To-Do list isn’t an actual folder but is an overview of all the items that have been marked for follow-up. So besides tasks, there could also be emails shown in this overview which you can mark differently via Automatic/Conditional Formatting.
Writing emails
 The default font settings for new emails, replies and forwards can be found in;
- Outlook 2007
Tools-> Options-> tab Mail Format… - Outlook 2010 / 2013 / 2016 / 2019 / Office 365
File-> Options-> section Mail-> button Stationery and Fonts…
Here you can also make a selection out of available Themes and Stationery which can contain font settings and background settings of their own.

When you have installed a standalone version of Outlook, the “Theme…” button is not available. Not even when you later install Word. You’ll need an Office Suite which contains both Outlook and Word for it to be enabled.
While writing an email, you can of course still modify the font settings as well; that’s obvious enough. If you cannot make any changes, your cursor is probably not in the message body or you are composing in Plain Text.
If you find the font settings when composing a new mail a bit too small, you might be easily tempted to increase the font size. At this point you should realize that the receiver will also receive it in that same size. If the font size is reasonable for emails already (somewhere between 8pt an 12pt for most fonts), then you might want to change your general DPI settings in Windows instead or change the zoom factor of your email.
Preface comments with
 When you have the “Preface comments with” option enabled, the font settings that are used are the same as the font settings which you have set for forwards and replies as mentioned above.
The “Preface comments with” option can be found here;
- Outlook 2007
Tools-> Options…-> button E-mail Options…-> option group: On replies and forwards-> option: Mark my comments with - Outlook 2010 / 2013 / 2016 / 2019 / Office 365
File-> Options-> section Mail-> option group: Replies and forwards-> option: Preface comments with
Background color for emails
 To change the background color while composing an email use;
- Create a new message-> tab Options-> button: Page Color
You can also set a picture to show as a watermark.
Search highlighting
 When you use Instant Search in Outlook, the words you have used in your search query will be highlighted. To change the highlight color (or to turn this feature off completely) go to;
- Outlook 2007
Tools-> Options…-> button: Search Options-> option: Highlight the words that I search for
Outlook 2010 / 2013 / 2016 / 2019 / Office 365
File-> Options-> section Search-> option: Highlight search terms in the results
Fonts used when printing
 You can also specify several font settings when printing an email or an overview of your Tasks, Calendar or any other folder.
- An overview of a folder or list are printed via the Table Style.
- An individual item will be printed in the Memo Style.
- The Calendar holds several Printing Styles of its own.
To change these Printing Styles use:
- Outlook 2007 and previous
File-> Page Setup-> Define Printing Styles…-> select the Printing Style that you’d like to change-> button Edit… - Outlook 2010 / 2013 / 2016 / 2019 / Office 365
File-> Print-> button Print Options-> Define Styles…-> select the Printing Style that you’d like to change-> button Edit…
Tip!
Additional font settings and other formatting changes can be made when you print your calendar via the Calendar Printing Assistant for Outlook 2007, which is a free tool from Microsoft. This tool only works with the 32-bit version of Office and requires an additional Registry fix to make it work with Outlook 2013, 2016, 2019 and Office 365.

